Now we are ready to install the Oracle Database 10g R2 software to complete our
Real Application Cluster installation, so start both nodes and login as oracle user. I've found difficult to run the installation process using my desktop machine on both nodes, so I didn't start the second node and I improved the virtual memory for the first node (it will have to start an ASM instance for about 100MB of RAM and the Oracle Cluster Instance racdb1 for about 300 MB of RAM) to the value of 748 MB. If you have resources on your machine you can follow the same installation process described below selecting and running both nodes, otherwise as I'll do you can add your second node later just using the addNode.sh script located in our Clusterware bin directory.
So I started my first node and logged in as oracle user.
We had already downloaded the Oracle Database 10g R2 software and my unzipped version
is in my home dircetory, so I type:
/home/oracle/database/runInstallerto start the Oracle Universal Installer. On the first screen click the NEXT button.
Choose Enterprise Edition for Installation Type and click NEXT.
The OUI should read your Oracle environment and suggest a name and a pathfor Home Details like in the picture.

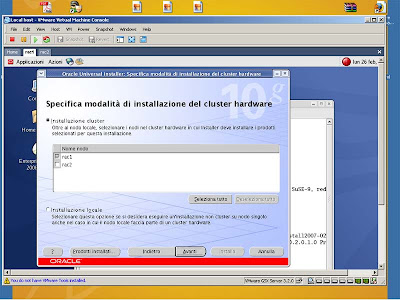
On the Hardware Cluster Installation Mode screen, select Cluster Installation (default option) and then check the second node (rac2) if you have started also your second node, otherwise select only the first node like in the picture and go on.

OUI will perform the prerequisite checks: it will suggest to improve our RAM, but we can
ignore this warning. It suggested me also to check my network configuration: I ignored that warning too.

On the Configuration Option screen select Create Database (default option) and then click NEXT.
Select Advanced on the Database Configuration screen like in the picture, click on NEXT and then on INSTALL button.

On the Database Templates screen select General Purpose and click NEXT.

Write racdb on Database identification screen for the Global Database Name and the SID Prefix.
On the Management Options screen select Configure the Database with the EM (Enterprise Manager).

On Database Credentials screen choose a password and use it for all accounts.
On Storage Options screen select ASM (Automatic Storage Management).

Choose your SYS password for the ASM instance.

If you select to use the spfile for the ASM instance you will receive this error.

So select for your ASM instance to use a pfile and go on.

Click OK and dbca will start your ASM instance.

Your ASM instance is starting...

Now we ahve to add our diskgroup for the ASM instance. So click on the Create New button.

The ASM will discovere our three devices. Select ASMD1 and ASMD2, give a name to these
disk groups (I choosed OMF) and check Normal as Redundancy, then click OK button.

The ASM instance will add OMF disk groups.

The ASM instance has mounted one disk groups named OMF.

Now click again on Create New button and select ASMD3, give a name to that disk group (I choosed FRA) and check External as Redundancy, then click OK.

As you will see, the ASM instance has mounted two disk groups, one named OMF and the other named FRA.

Select OMF and click NEXT.

Be sure to use Oracle Managed File options and the OMF disk groups.

For your Flash Recovery Area dbca will suggest again +OMF, so simply select the Browse button and choose your FRA ASM disk group like in the picture.

Check Enable Archiving and then click on the NEXT button.

On Database Content screen select the sample schemas and then click NEXT.

On Database Services simply click on NEXT button.

You will be prompted to use about 41% of your memory. Click OK.

In this screen you can choose your initialization parameters, I left all the default value suggested.

A summary of your configuration and storage options. Click NEXT.

Now select Create Database and click FINISH.

A summary screen will be prompted. Click OK and your database setup will start.

Dbca installation process at 2%.

Dbca installation process at 30%.

Dbca installation process at 79%.

Oracle Database 10g installation complete. Click on EXIT button.

Your cluster will start... You should see just your first node instance racdb1 of the database racdb running.

Login as root user from a terminal window and execute the root.sh script from your first node.
Dbca will suggest to execute the same scripts on your second node if you choosed to use also the second node during the installation process.

Finally you have completed the installation process of the Oracle Database 10g on your first node. Some URL will be showed on the last summary window.


