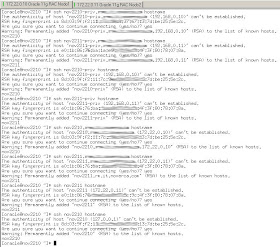
First of all let's set up the ssh user equivalency: use pgrep sshd to see if ssh daemon is running.
You need either an RSA or a DSA key for the SSH protocol. RSA is used with the SSH 1.5 protocol, while DSA is the default for the SSH 2.0 protocol.
To configure SSH you should create RSA keys on each node using the following steps as oracle user:
su - oracle
ssh-keygen -t rsa -b 1024
When it asks for a passphrase, leave it empty. This command writes the RSA public key to the ~/.ssh/id_rsa.pub file and the private key to the ~/.ssh/id_rsa file.
Repeat the above steps on the other node that you intend to make a member of the cluster, using the RSA key.
Then you should add all keys to a common authorized_keys file.
Combine the contents of the id_rsa.pub files from each server. This operation can be done starting simply from one node. Run the commands below from the first node (in my case 172.22.0.10), for example, as the oracle user (and from /home/oracle directory):
cat ~/.ssh/id_rsa.pub >> ~/.ssh/authorized_keys
ssh 172.22.0.11 cat ~/.ssh/id_rsa.pub >> ~/.ssh/authorized_keys
scp ~/.ssh/authorized_keys 172.22.0.11:/home/oracle/.ssh/
Each time you connect from any node to a new hostname for the first time, you will see a message similar to "The authenticity of host '172.22.0.11 (172.22.0.10)' can't be established. Are you sure you want to continue connecting (yes/no)?". Type "yes" and press ENTER.


Then edit /etc/hosts file for both nodes to set up public and private networking.


Use the following command syntax, where hostname1, hostname2, and so on, are the public hostnames(alias and fully qualified domain name) of nodes in the cluster to run SSH from the local node to each node, including from the local node to itself, and from each node to each other node:
ssh hostname1 hostname
At the end of this process, the public hostname for each member node should be registered in the known_hosts file for all other cluster member nodes.

Just because my nodes are connected to EMC SP Agent (Array Agent) I need to install Navisphere Host Agent, downloaded from EMC website.
Host Agent is required for the registration of the host bus adapters with the SPs to which they are connected and for integrating host-side information such as device and volume names. A Host Agent automatically registers hosts and HBAs and also provides drive mapping information for the UI and CLI


To let both nodes synced I used Network Time Server protocol, because you should ensure that the system clocks on all nodes are as close as possible, so edit /etc/ntp.conf file and add your ntp server.
Then configure ntpd to start automatically and update manually both nodes.


On all cluster nodes, verify that the kernel parameters are set to values greater than or equal to the recommended value. The procedure following the table describes how to verify and set the values on /etc/sysctl.conf. Then use /sbin/sysctl -p to load this configuration without restarting the nodes.


To improve the performance of the software on Linux systems, you must increase the following shell limits for the oracle user, editing /etc/security/limits.conf file.


Depending on the oracle user's default shell, make the following changes to the default shell startup file. For the Bourne, Bash, or Korn shell, add the following lines to the /etc/profile file (or the file/etc/profile.local on SUSE systems):
For the C shell (csh or tcsh), add the following lines to the /etc/csh.login file (or the file/etc/csh.login.local on SUSE systems):

(*Modified on 27 September 2010: as stated on note ID 726833.1 on Oracle 11gR2 there's no need to configure the handcheck-timer module as I suggested below)
Before installing Oracle Real Application Clusters on Linux systems, verify that the hangcheck-timer module (hangcheck-timer) is loaded and configured correctly.


To improve the performance of the software on Linux systems, you must increase the following shell limits for the oracle user, editing /etc/security/limits.conf file.

session required /lib/security/pam_limits.so

Depending on the oracle user's default shell, make the following changes to the default shell startup file. For the Bourne, Bash, or Korn shell, add the following lines to the /etc/profile file (or the file/etc/profile.local on SUSE systems):

For the C shell (csh or tcsh), add the following lines to the /etc/csh.login file (or the file/etc/csh.login.local on SUSE systems):

(*Modified on 27 September 2010: as stated on note ID 726833.1 on Oracle 11gR2 there's no need to configure the handcheck-timer module as I suggested below)
Before installing Oracle Real Application Clusters on Linux systems, verify that the hangcheck-timer module (hangcheck-timer) is loaded and configured correctly.
hangcheck-timer monitors the Linux kernel for extended operating system hangs that could affect the reliability of a RAC node and cause a database corruption.
If a kernel/device driver hang occurs, then the module restarts the node in seconds. There are 3 parameters used to control the behavior of the module:
1. The hangcheck_tick parameter: it defines how often, in seconds, the hangcheck-timer checks the node for hangs. The default value is 60 seconds. Oracle recommends to set it to 1(hangcheck_tick=1).
2.The hangcheck_margin parameter: it defines how long the timer waits, in seconds, for a response from the kernel. The default value is 180 seconds. Oracle recommends to set it to 10(hangcheck_margin=10)
3.The hangcheck_reboot parameter: If the value of hangcheck_reboot is equal to or greater than 1, then the hangcheck-timer module restarts the system. If the hangcheck_reboot parameter is set to zero, then the hangcheck-timer module will not restart the node. It should always be set to 1.
If the kernel fails to respond within the sum of the hangcheck_tick and hangcheck_margin parameter values, then the hangcheck-timer module restarts the system.
Log in as root, and enter the following command to check the kernel version:
uname -a
On Kernel 2.6 enter a command similar to the following to start the module located in the directories of the current kernel version:


