Pages

Tuesday, June 19, 2007

Oracle Data Guard: 03 physical standby database configuration

Click here to read the previous post

Now from the primary database start the listener, typing (see the picture below):
lsnrctl start


Then mount the database (see the picture below).


Now you can verify that the listener is listening for the PRIMARY service (see the picture below).


Also from the standby database start the listener, typing (see the picture below):
lsnrctl start


Then mount the database (see the picture below).


Now you can verify that the listener is listening for the STANDBY service (see the picture below).


We have just few work to complete the configuration... From the standby database, in the mount state, type (see the picture below):
selecr sequence#, first_time, next_time from v$archived_log order by sequence#;

Then
alter database recover managed standby database disconnect;


From the primary database type (see the picture below):
alter database open;

and then:
alter system set log_archive_dest_state_2=enable scope=both;

and
select status, error from v$archived_dest where dest_id=2;


Now force a log switch (see the picture below)
alter system switch logfile;


And view that something happened into the standby database :))) (see the picture below)
select sequence#, first_time, next_time from v$archived_log order by sequence#;


And again ...
(see the picture below)


the same results :)))
(see the picture below)

Friday, April 27, 2007

Oracle TimesTen: 01 Installation on Windows systems

Oracle TimesTen provides a real-time infrastructure software designed for low latency, high-volume data, event and transaction management. It is used intensively in the telecom and financial markets because of their very high performance and robust reliability.

Oracle TimesTen uses in-memory database technology to speed access to data. Indexing, query optimization, and storage management, for example, are designed specially for in-memory data access. The result is high throughput and low, predictable response times, even on commodity hardware. The product also incorporates replication facilities, non-blocking operation, and an event-notification mechanism that works together with materialized views to convey changes to other systems. Oracle TimesTen enables the development of mission-critical, real-time applications in which response time is very important.

Oracle TimesTen also offers a Cache product that interoperates with an Oracle database backend, using one of several protocols, to cache frequently used data in TimesTen. SQL predicates can be used to specify what data is cached, or data can be loaded into the cache on demand (and later automatically aged out). Data can be changed in the cache, with writes being propagated synchronously or asynchronously back to Oracle.

On UNIX, you can install more than one instance of any TimesTen release. For the current release by default the instance name is tt70. The TimesTen installation script can detect if an instance of the particular release of TimesTen already exists on the machine and will prompt you for a new instance name and port number for the main TimesTen daemon.
Remember: on Windows you can only install one instance of TimesTen. The instance name is case-insensitive, can have up to 255 characters, can include underscores or period, but no other special characters.

Before installing TimesTen, make sure the appropriate requirements are met for your operating system. On platforms where JDBC is supported you must have the appropriate version of the JDK installed on your machine to use JDBC.
In my case I will install TimesTen for my environment, that is: Windows XP for Intel IA-32 CPU. It supports both JDK 1.4 and JDK 5.0.

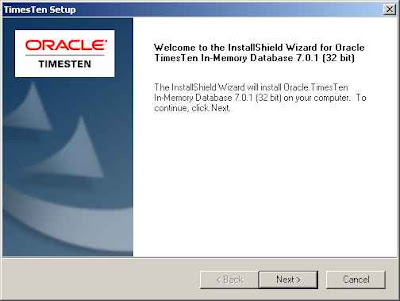
Download from the Oracle website the file timesten70100.win32.zip, save it on a folder and extract it: double click on the setup.exe file and a Welcome wizard will start (see the figure below).


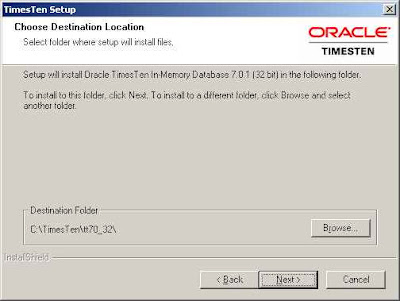
Click the NEXT button and choose the destination location where setup will install files.
The defaul location suggested is C:\TimesTen\tt70_32\ (see the figure below); click NEXT.


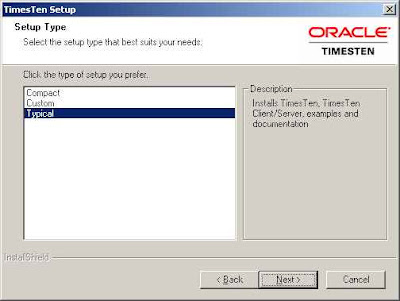
Select the setup type that best suits your needs.
- Compact installs the TimesTen client, ODBC drivers and examples;
- Typical installs the TimesTen Data Manager, TimesTen Client, TimesTen
Server, documentation and examples;
- With Custom you may customize installation by selecting any of the following
components: TimesTen Data Manager, TimesTen Client and/or
TimesTen Server including the DEBUG drivers.
I choose Typical (see the figure below) and then click NEXT.


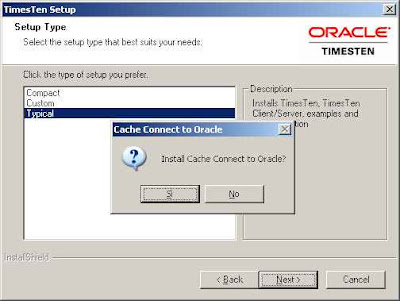
When prompted to install Cache Connect to Oracle (see the figure below) you must have at least a client installation of Oracle Database 9i or 10g on the machine where you are installing TimesTen, to successful install the Cache Connect.
Oracle TimesTen can run as a standalone database, but it can also optionally run as a performance accelerator using the Cache Connect for data moving to or from an existing Oracle Database. Click YES.


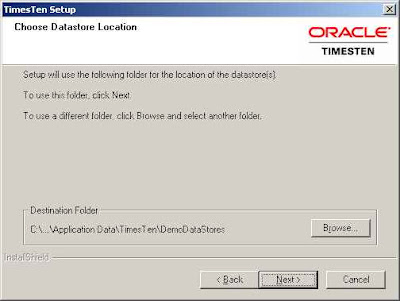
Choose the datastore location: the default is
C:\Documents and Settings\USERNAME\Application Data\TimesTen\DemoDataStores.
Select your location (see the figure below) and click NEXT.


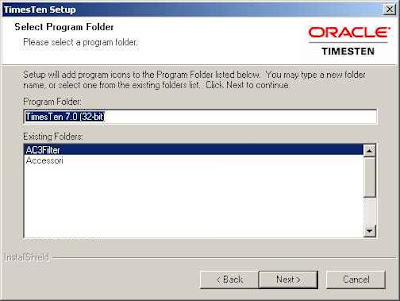
Select a program folder (see the figure below) and click NEXT.


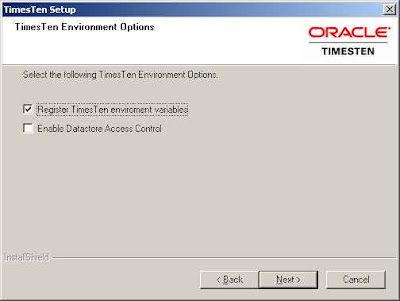
Select the TimesTen Environment Options (see the figure below) and click NEXT.
The Datastore Access Control provides an environment of basic control for applications that use the internally defined privileges.
In TimesTen, user privileges are granted on a instance wide-basis. A user’s privileges apply to all data stores in a given TimesTen instance or installation.
Anyway in this installation I don't enable the Datastore Access Control.


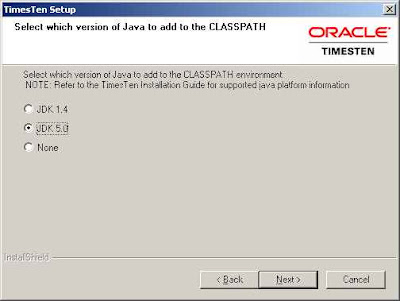
Select which version of Java to add to the CLASSPATH environment (see the figure below) and click NEXT.
I have the JDK 5.0 installed on my machine.


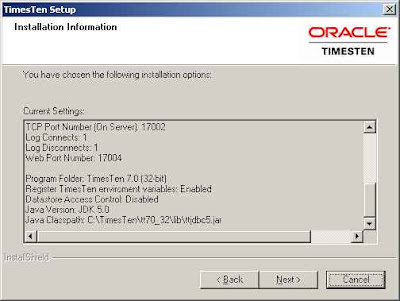
Confirm your installation informations (see the figure below) clicking NEXT.


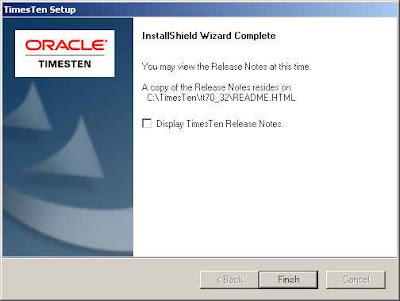
When the Install Wizard is completed, click the FINISH button (see the figure below).


In the next step I will setup a Data Sources (ODBC) to connect and use the Oracle TimesTen.

Thursday, April 26, 2007

Recovery Manager: 07 Creating compressed backups

Click here to read the previous step

Untill Oracle 9i version you could reduce the size of backups backing up only used blocks and skipping unused blocks: in this way you would reduce only the backup sizes of datafiles that were oversized or had significant free space.

Oracle 10g RMAN has introduced the capability to compress backups: indeed it is possible now to compress backups regardless of the contents of the datafiles, using the new BACKUP AS COMPRESSED command.
Compressed backups work only with backup sets (database, tablespace, and datafile backup sets), so you cannot compress image copies.

The following command will backup an entire database using a compressed backup
set:
RMAN> backup as compressed backupset database;
To configure the default backup type for a compressed backup set use the
following command:
RMAN> configure device type disk backup type to compressed backupset;
Compressed database backup sets are compressed at approximately a 5-to-1
ratio, or 20 percent of the size of a standard backup set.

Recovery Manager: 06 Creating image copies

Click here to read the previous step.

An image copy in RMAN is equivalent to an operating system copy command such as cp or dd in Unix, or COPY in Windows. Image copies can be stored only on disk, so you cannot use tape channels for image copies, but if multiple files are to be copied, then you can consider parallelism.
This means that many of the great features of backup sets (such as incremental backup, compression, writing directly to tape, or controlling the size of the output pieces) cannot be used.
But it means that a restore can be very fast, because there is no need to extract the file from a backup set.

To configure the default backup type for an image copy use the
following command. This parameter or setting configures the type of backup to be an image
copy:
RMAN>configure device type disk backup type to copy;
The following command shows an example of using the RMAN COPY command to create an image copy of two database files (the SYSTEM tablespace and a control file) to the /u01/app/oracle/flash_recovery_area/ directory:
RMAN> run
2> {
3> allocate channel ch1 type disk;
4> copy datafile 1 to '/u01/app/oracle/flash_recovery_area/SYSTEM01.DBF' ,
5> current controlfile to '/u01/app/oracle/flash_recovery_area/CONTROL01.ctl';
6> }
In the above image copy example, the location of the SYSTEM01.DBF file must be known before you do the copy or you have to know that the datafile number 1 is your SYSTEM datafile. Anyway you can understand this requires a lot of extra work.
Likely in Oracle 10g, there is the new BACKUP AS COPY command: now you can perform image copies of an entire database, multiple tablespaces, datafiles, and archive logs without having to specify all of the individual files.
The following command shows an example of using the new RMAN BACKUP AS COPY command to create an image copy of an entire database:
RMAN> backup as copy database;
If you have not changed the default configuration the above command launchs one disk channel
and copies all the datafiles and the controlfile to the flash recovery area.
The following command instead will backup all the archive log files to the flash recovery area, deleting all the input file after the command is successful completed.
RMAN> backup as copy archivelog all delete all input;

Thursday, April 19, 2007

Recovery Manager: 05 Creating backup sets

Click here to read the previous step

As you know Recovery Manager can back up the Oracle objects in two ways:
as image copies or as backup sets.

Image copies are identical copies of the original file (database files, archive logs, or control files), are not stored in a special RMAN format and can be stored only on disk.
A backup set instead is a proprietary format: so only RMAN can manipulated the backup set.
A backup set can be written to disk or to tape, unlike image copies. Moreover it can be compressed and requires less space than a image copy; RMAN can also multiplex the files in a backup set, namely RMAN reads from multiple files and then each of the file blocks are written and interspersed to the same backup set.
Image copies cannot be multiplexed instead.

Backup sets have also the ability to make incremental backups. Furthermore, a backup set is always smaller than an image copy, because backup sets of datafiles never include blocks that have not been used, whereas an image copy of necessity includes the complete file.

To configure the default device to tape use the following command. This command sets the default media for RMAN to store the backup information:
RMAN>configure default device type to sbt;
To configure the default device to disk use the following command.
RMAN>configure default device type to disk;
To configure the default backup type for a backup set use the following command. This parameter or setting configures the type of backup to be a backup set:
RMAN>configure device type disk backup type to backupset;
To configure a default device for either tape or disk to a compressed backup set, use the
following commands:
RMAN>configure device type disk backup type to compressed backupset;
RMAN>configure device type sbt backup type to compressed backupset;
In the following example, you are backing up the database and storing in two backup sets:
FULL DATAFILE BACKUPSET and ARCHIVE LOG BACKUP SET.
FULL DATAFILE BACKUPSET is made up of four backup pieces;
ARCHIVE LOG BACKUPSET is comprised on two backup pieces (you can identify these pieces in the following log, highlighted in bold).

A format of db_%u_%d_%s means that a db_ will be concatenated to the backup set
unique identifier and then concatenated to database name with the backup set number.
The following list includes the format specifications for the FORMAT option used in the example:
%u Specifies an eight-character name constituted by compressed representations of the backup set or image copy number.
%d Specifies the name of the database.
%s Specifies the backup set number.
%t Specifies the backup set timestamp
%p Specifies the piece number within the backup set.
RMAN> run {
2> allocate channel c1 type disk;
3> allocate channel c2 type disk;
4> backup database format 'db_%u_%d_%s';
5> backup format 'log_t%t_s%s_p%p' (archivelog all);
6> }
released channel: ORA_DISK_1
allocated channel: c1
channel c1: sid=140 devtype=DISK

allocated channel: c2
channel c2: sid=145 devtype=DISK

Starting backup at 16-APR-07
channel c1: starting full datafile backupset
channel c1: specifying datafile(s) in backupset
input datafile fno=00001
name=/u01/app/oracle/oradata/PRIMARY/datafile/o1_mf_system_2yss9qlx_.dbf
input datafile fno=00004
name=/u01/app/oracle/oradata/PRIMARY/datafile/o1_mf_users_2yss9r32_.dbf
channel c1: starting piece 1 at 16-APR-07
channel c2: starting full datafile backupset
channel c2: specifying datafile(s) in backupset
input datafile fno=00003
name=/u01/app/oracle/oradata/PRIMARY/datafile/o1_mf_sysaux_2yss9qop_.dbf
input datafile fno=00002
name=/u01/app/oracle/oradata/PRIMARY/datafile/o1_mf_undotbs1_2yss9r16_.dbf
channel c2: starting piece 1 at 16-APR-07
channel c2: finished piece 1 at 16-APR-07
piece handle=/u01/app/oracle/product/10.2.0/db_1/dbs/db_0aifbgff_PRIMARY_10
tag=TAG20070416T220221 comment=NONE
channel c2: backup set complete, elapsed time: 00:02:09
channel c2: starting full datafile backupset
channel c2: specifying datafile(s) in backupset
including current control file in backupset
channel c2: starting piece 1 at 16-APR-07
channel c2: finished piece 1 at 16-APR-07
piece handle=/u01/app/oracle/product/10.2.0/db_1/dbs/db_0bifbgji_PRIMARY_11
tag=TAG20070416T220221 comment=NONE
channel c2: backup set complete, elapsed time: 00:00:12
channel c2: starting full datafile backupset
channel c2: specifying datafile(s) in backupset
including current SPFILE in backupset
channel c2: starting piece 1 at 16-APR-07
channel c2: finished piece 1 at 16-APR-07
piece handle=/u01/app/oracle/product/10.2.0/db_1/dbs/db_0cifbgjv_PRIMARY_12
tag=TAG20070416T220221 comment=NONE
channel c2: backup set complete, elapsed time: 00:00:04
channel c1: finished piece 1 at 16-APR-07
piece handle=/u01/app/oracle/product/10.2.0/db_1/dbs/db_09ifbgfe_PRIMARY_9
tag=TAG20070416T220221 comment=NONE
channel c1: backup set complete, elapsed time: 00:02:45
Finished backup at 16-APR-07

Starting backup at 16-APR-07
current log archived
channel c1: starting archive log backupset
channel c1: specifying archive log(s) in backup set
input archive log thread=1 sequence=4 recid=3 stamp=618986417
channel c1: starting piece 1 at 16-APR-07
channel c2: starting archive log backupset
channel c2: specifying archive log(s) in backup set
input archive log thread=1 sequence=5 recid=4 stamp=620085919
channel c2: starting piece 1 at 16-APR-07
channel c2: finished piece 1 at 16-APR-07
piece handle=/u01/app/oracle/product/10.2.0/db_1/dbs/log_t620085921_s14_p1
tag=TAG20070416T220519 comment=NONE
channel c2: backup set complete, elapsed time: 00:00:04
channel c1: finished piece 1 at 16-APR-07
piece handle=/u01/app/oracle/product/10.2.0/db_1/dbs/log_t620085921_s13_p1
tag=TAG20070416T220519 comment=NONE
channel c1: backup set complete, elapsed time: 00:00:19
Finished backup at 16-APR-07
released channel: c1
released channel: c2

Let's see the backup of our database.
RMAN> list backup of database;

List of Backup Sets
===================

BS Key Type LV Size Device Type Elapsed Time Completion Time
------- ---- -- ---------- ----------- ------------ ---------------
9 Full 176.40M DISK 00:02:05 16-APR-07
BP Key: 9 Status: AVAILABLE Compressed: NO Tag: TAG20070416T220221
Piece Name: /u01/app/oracle/product/10.2.0/db_1/dbs/db_0aifbgff_PRIMARY_10
List of Datafiles in backup set 9
File LV Type Ckp SCN Ckp Time Name
---- -- ---- ---------- --------- ----
2 Full 555181 16-APR-07 /u01/app/oracle/oradata/PRIMARY/datafile/o1_mf_undotbs1_2yss9r16_.dbf
3 Full 555181 16-APR-07 /u01/app/oracle/oradata/PRIMARY/datafile/o1_mf_sysaux_2yss9qop_.dbf

BS Key Type LV Size Device Type Elapsed Time Completion Time
------- ---- -- ---------- ----------- ------------ ---------------
12 Full 352.55M DISK 00:02:41 16-APR-07
BP Key: 12 Status: AVAILABLE Compressed: NO Tag: TAG20070416T220221
Piece Name: /u01/app/oracle/product/10.2.0/db_1/dbs/db_09ifbgfe_PRIMARY_9
List of Datafiles in backup set 12
File LV Type Ckp SCN Ckp Time Name
---- -- ---- ---------- --------- ----
1 Full 555175 16-APR-07 /u01/app/oracle/oradata/PRIMARY/datafile/o1_mf_system_2yss9qlx_.dbf
4 Full 555175 16-APR-07 /u01/app/oracle/oradata/PRIMARY/datafile/o1_mf_users_2yss9r32_.dbf

The job launches two channels, capable of writing to the file system. Each channel will generate its own backup set, and they will be generated in parallel.

The preceding examples are of online backups, but if the target is in noarchivelog mode, RMAN can do offline backups.
An RMAN offline backup is done in mount mode. A user-managed offline backup done with operating system utilities is always done when the instance is shut down, because otherwise you
cannot guarantee that the datafile and controlfile copies will be read-consistent;
RMAN needs the target database controlfile to be mounted in order to get to its repository.
For this reason, RMAN offline backups are done in mount mode.

Offline backups are done in mount mode, but the database must have been cleanly shut down first. The backup will fail if the shutdown were a crash or a SHUTDOWN ABORT.

The following is an example of an offline backup:
RMAN> run
2> {
3> shutdown immediate;
4> startup mount;
5> backup as backupset database;
6> alter database open;
7> }
Click here to read the next step

Friday, April 6, 2007

Recovery Manager: 04 executing commands from shell scripts

Click here to read the previous step

First of all... what is a shell ?
A shell is a command interpreter: when you issue commands to the Unix operating system they are translated into a form the kernel (a software layer able to communicate with the hardware layer to complete tasks such as writing to disk or using a printer) can understand and returns the results to you.
Users direct the operation of the computer by entering command input as text for a shell to execute.

In the Unix operating system there are available many types of shell, but they work fundamentally in the same ways. Since in the Unix operating system users can select which shell they want to use (which program should execute when they login), many shells have been developed:
  • sh: The Bourne shell, written by Steven Bourne. It is the original UNIX shell.The Bourne shell was the shell used in early versions of Unix and became a de facto standard; every Unix-like system has at least one shell compatible with the Bourne shell. The Bourne shell program is located in the UNIX file hierarchy at /bin/sh
  • csh: The C shell, a Unix shell developed by Bill Joy for the BSD Unix system, uses syntax similar to the C programming language. The C shell added many feature improvements over the Bourne shell, such as aliases and command history.
  • ksh: The Korn shell, a Unix shell developed by David Korn, is considered a superset of the Bourne shell. The main advantage of ksh over the traditional Unix shell is in its use as a programming language. Since its conception, several features were gradually added, while maintaining strong backwards compatibility with the Bourne shell.
  • bash: The Bourne Again Shell is the Linux default shell which includes features of the Bourne shell as well as the Korn, C, and TCSH shells.
It is possible to invoke any available shell from within another shell. To start a new shell, you
simply type the name of the shell you want to run, ksh, csh, or sh. It is also possible to set the default startup shell for all your future sessions. The default shell for your account is stored in the system database /etc/passwd, along with the other information about your account. To change your default shell, use the chsh command.

And now... what is a shell script ?
A shell script is simply a file containing a set of commands. The shell script looks just like any regular UNIX file, but it contains commands or conditional (if-then, while-do, until-do) statements that can be executed by the shell.

Now... let's go to analyse the following Rman shell script:
The EOF text strings act as markers that tell Unix that any commands between the EOFs are commands associated with the command to the immediate left... in our case... the rman command.
If RMAN encounters an error, it returns a nonzero exit code that is evaluated within the shell script.

#!/bin/ksh
#----------------------------------------------
export TARGET_CONN=sys/oracle
#----------------------------------------------
rman <<EOF

# Connect to the target and the catalog
connect target ${TARGET_CONN}
# Run the backup command.
run { allocate channel d1 type disk;
backup as compressed backupset datafile 4; }
EOF

#Test for success of RMAN operation
if [ $? -ne 0 ];
then
echo "RMAN shell script completed with problems..."
else
echo "RMAN shell script successful completed..."
fi
#----------------------------------------------
exit


Click here to read the next step

Thursday, April 5, 2007

Recovery Manager: 03 executing commands from prompt and from file

Click here to read the previous step.

Would you like to create a backup of your datafiles in the flash recovery area directory.?
Just type the following commands, but remember that the target database must be in archivelog mode (alter database archivelog) before running this on-line backup:
$ rman target / nocatalog

Recovery Manager: Release 10.2.0.1.0 - Production on Wed Apr 4 06:19:33 2007

Copyright (c) 1982, 2005, Oracle. All rights reserved.

connected to target database: PRIMARY (DBID=1453964262)
using target database control file instead of recovery catalog
Let's gather more information about our database.

RMAN> report schema;

Report of database schema

List of Permanent Datafiles
===========================
File Size(MB) Tablespace RB segs Datafile Name
---- -------- -------------------- ------- ------------------------
1 480 SYSTEM ***
/u01/app/oracle/oradata/PRIMARY/datafile/o1_mf_system_2yss9qlx_.dbf
2 25 UNDOTBS1 ***
/u01/app/oracle/oradata/PRIMARY/datafile/o1_mf_undotbs1_2yss9r16_.dbf
3 240 SYSAUX ***
/u01/app/oracle/oradata/PRIMARY/datafile/o1_mf_sysaux_2yss9qop_.dbf
4 5 USERS ***
/u01/app/oracle/oradata/PRIMARY/datafile/o1_mf_users_2yss9r32_.dbf

List of Temporary Files
=======================
File Size(MB) Tablespace Maxsize(MB) Tempfile Name
---- -------- -------------------- ----------- --------------------
1 25 TEMP 32767
/u01/app/oracle/oradata/PRIMARY/datafile/o1_mf_temp_2yssg3oo_.tmp

Now I choose I want a compressed backup of datafile number 4.

RMAN> run { allocate channel d1 type disk;
2> backup as compressed backupset datafile 4; }

allocated channel: d1
channel d1: sid=159 devtype=DISK

Starting backup at 04-APR-07
channel d1: starting compressed full datafile backupset
channel d1: specifying datafile(s) in backupset
input datafile fno=00004
name=/u01/app/oracle/oradata/PRIMARY/datafile/o1_mf_users_2yss9r32_.dbf
channel d1: starting piece 1 at 04-APR-07
channel d1: finished piece 1 at 04-APR-07
piece
handle=/u01/app/oracle/flash_recovery_area/PRIMARY/backupset/2007_04_04/o1_mf_nnndf_TAG20070404T062359_316b30rc_.bkp
tag=TAG20070404T062359 comment=NONE
channel d1: backup set complete, elapsed time: 00:00:03
Finished backup at 04-APR-07
released channel: d1
Now I choose I want a compressed backup of the tablespace USERS.

RMAN> run { allocate channel d1 type disk;
2> backup as compressed backupset tablespace users;}

allocated channel: d1
channel d1: sid=159 devtype=DISK

Starting backup at 04-APR-07
channel d1: starting compressed full datafile backupset
channel d1: specifying datafile(s) in backupset
input datafile fno=00004
name=/u01/app/oracle/oradata/PRIMARY/datafile/o1_mf_users_2yss9r32_.dbf
channel d1: starting piece 1 at 04-APR-07
channel d1: finished piece 1 at 04-APR-07
piece
handle=/u01/app/oracle/flash_recovery_area/PRIMARY/backupset/2007_04_04/o1_mf_nnndf_TAG20070404T062502_316b4yns_.bkp
tag=TAG20070404T062502 comment=NONE
channel d1: backup set complete, elapsed time: 00:00:01
Finished backup at 04-APR-07
released channel: d1
Because datafile number 4 and the tablespace USERS are the same thing, if you want to see
how many backup you have for the datafile number 4, you would see two different compressed backup.

RMAN> list backup of datafile 4;

List of Backup Sets
===================
BS Key Type LV Size Device Type Elapsed Time Completion Time
------- ---- -- ---------- ----------- ------------ ---------------
4 Full 432.00K DISK 00:00:03 04-APR-07
BP Key: 4 Status: AVAILABLE Compressed: YES Tag:TAG20070404T062359
Piece Name:
/u01/app/oracle/flash_recovery_area/PRIMARY/backupset/2007_04_04/o1_mf_nnndf_TAG20070404T062359_316b30rc_.bkp
List of Datafiles in backup set 4
File LV Type Ckp SCN Ckp Time Name
---- -- ---- ---------- --------- ----
4 Full 545019 04-APR-07
/u01/app/oracle/oradata/PRIMARY/datafile/o1_mf_users_2yss9r32_.dbf

BS Key Type LV Size Device Type Elapsed Time Completion Time
------- ---- -- ---------- ----------- ------------ ---------------
5 Full 432.00K DISK 00:00:01 04-APR-07
BP Key: 5 Status: AVAILABLE Compressed: YES Tag:TAG20070404T062502
Piece Name:
/u01/app/oracle/flash_recovery_area/PRIMARY/backupset/2007_04_04/o1_mf_nnndf_TAG20070404T062502_316b4yns_.bkp
List of Datafiles in backup set 5
File LV Type Ckp SCN Ckp Time Name
---- -- ---- ---------- --------- ----
4 Full 545058 04-APR-07
/u01/app/oracle/oradata/PRIMARY/datafile/o1_mf_users_2yss9r32_.dbf
Now I choose I want a backup of the current control file.
RMAN> run { allocate channel d1 type disk;
2> backup as backupset current controlfile;}

allocated channel: d1
channel d1: sid=159 devtype=DISK

Starting backup at 04-APR-07
channel d1: starting full datafile backupset
channel d1: specifying datafile(s) in backupset
including current control file in backupset
channel d1: starting piece 1 at 04-APR-07
channel d1: finished piece 1 at 04-APR-07
piece
handle=/u01/app/oracle/flash_recovery_area/PRIMARY/backupset/2007_04_04/o1_mf_ncnnf_TAG20070404T062800_316bbjx4_.bkp
tag=TAG20070404T062800 comment=NONE
channel d1: backup set complete, elapsed time: 00:00:01
Finished backup at 04-APR-07
released channel: d1
And here it's the command to list how many backup I have for my control file.
RMAN> list backup of controlfile;

List of Backup Sets
===================

BS Key Type LV Size Device Type Elapsed Time Completion Time
------- ---- -- ---------- ----------- ------------ ---------------
6 Full 6.77M DISK 00:00:01 04-APR-07
BP Key: 6 Status: AVAILABLE Compressed: NO Tag: TAG20070404T062800
Piece Name:
/u01/app/oracle/flash_recovery_area/PRIMARY/backupset/2007_04_04/o1_mf_ncnnf_TAG20070404T062800_316bbjx4_.bkp
Control File Included: Ckp SCN: 545172 Ckp time: 04-APR-07
Now I just delete the backupset files number 4 and 5 and then I run again the same commands above, but this time from a file.
RMAN> delete backupset 4,5;

allocated channel: ORA_DISK_1
channel ORA_DISK_1: sid=159 devtype=DISK

List of Backup Pieces
BP Key BS Key Pc# Cp# Status Device Type Piece Name
------- ------- --- --- ----------- ----------- ----------
4 4 1 1 AVAILABLE DISK
/u01/app/oracle/flash_recovery_area/PRIMARY/backupset/2007_04_04/o1_mf_nnndf_TAG20070404T062359_316b30rc_.bkp
5 5 1 1 AVAILABLE DISK
/u01/app/oracle/flash_recovery_area/PRIMARY/backupset/2007_04_04/o1_mf_nnndf_TAG20070404T062502_316b4yns_.bkp

Do you really want to delete the above objects (enter YES or NO)? yes
deleted backup piece
backup piece
handle=/u01/app/oracle/flash_recovery_area/PRIMARY/backupset/2007_04_04/o1_mf_nnndf_TAG20070404T062359_316b30rc_.bkp
recid=4 stamp=618992640
deleted backup piece
backup piece
handle=/u01/app/oracle/flash_recovery_area/PRIMARY/backupset/2007_04_04/o1_mf_nnndf_TAG20070404T062502_316b4yns_.bkp
recid=5 stamp=618992702
Deleted 2 objects
Edit and prepare a Recovery Manager command file.
vi backup_users.rmn
Then type into it the following rman commands:
run
{
#allocate the channel
allocate channel d1 type disk;

#issue the backup command
backup as compressed backupset datafile 4;
}
Then execute that file using the following command.
$ rman target / nocatalog @backup_users.rmn log=backup_users.log
The log option is useful to analyse your backup status, indeed:
$vi backup_users.log

Recovery Manager: Release 10.2.0.1.0 - Production on Wed Apr 4 06:36:04 2007
Copyright (c) 1982, 2005, Oracle. All rights reserved.

connected to target database: PRIMARY (DBID=1453964262)
using target database control file instead of recovery catalog

RMAN> run
2> {
3> #allocate the channel
4> allocate channel d1 type disk;
5>
6> #issue the backup command
7> backup as compressed backupset datafile 4;
8> }
9>
10>
allocated channel: d1
channel d1: sid=153 devtype=DISK

Starting backup at 04-APR-07
channel d1: starting compressed full datafile backupset
channel d1: specifying datafile(s) in backupset
input datafile fno=00004
name=/u01/app/oracle/oradata/PRIMARY/datafile/o1_mf_users_2yss9r32_.dbf
channel d1: starting piece 1 at 04-APR-07
channel d1: finished piece 1 at 04-APR-07
piece
handle=/u01/app/oracle/flash_recovery_area/PRIMARY/backupset/2007_04_04/o1_mf_nnndf_TAG20070404T063611_316bsvjc_.bkp
tag=TAG20070404T063611 comment=NONE
channel d1: backup set complete, elapsed time: 00:00:01
Finished backup at 04-APR-07
released channel: d1

Recovery Manager complete.

My backup is gone well!!!

A simple Hello World program using C and PRO*C

Just because many visitors ask me to write some C and PRO*C code to interface with an ORACLE database, today I will write a simple "Hello World!" program.

First of all you have to set at least your LD_LIBRARY_PATH and in general you should set as $ORACLE_HOME/lib.
In my .profile file I have:
export ORACLE_SID=primary
export ORACLE_BASE=/u01/app/oracle
export ORACLE_HOME=$ORACLE_BASE/product/10.2.0/db_1
export LD_LIBRARY_PATH=$ORACLE_HOME/lib
export PATH=$ORACLE_HOME/bin;/bin;/usr/bin;/usr/sbin;/usr/local/bin;/usr/X11R6/bin
umask 022

Then login as sysdba and create the user hello:
CREATE USER hello IDENTIFIED BY hello
DEFAULT TABLESPACE USERS
QUOTA UNLIMITED ON USERS;
Grant to the hello user the following privileges:
GRANT CREATE SESSION, CONNECT, RESOURCE TO hello;
Login as hello user and create the hello_world table:
CONNECT hello/hello;
CREATE TABLE hello_world (msg VARCHAR2(50));
and exit from sqlplus;

Then type
vi hellodb.pc
and write the following code:
#include <stdio.h>

#include <sqlca.h>
#include <sqlcpr.h>
#include <oraca.h>
#include <sqlda.h>

/* Declare error handling function. */
void sql_error();

int main(int argc, char** argv)
{
char user[]="hello";
char pwd[]="hello";
char msg_buf[51]="";

/* Register sql_error() as the error handler. */
EXEC SQL WHENEVER SQLERROR DO sql_error("ORACLE error\n");

EXEC SQL CONNECT :user IDENTIFIED BY :pwd;

EXEC SQL
INSERT INTO hello_world
VALUES ('Hello world!');

EXEC SQL COMMIT;

EXEC SQL
SELECT msg
INTO :msg_buf
FROM hello_world
WHERE rownum <= 1;

printf("%s\n", msg_buf);

return(0);
}

void sql_error(char *msg)
{
char err_msg[128];
int buf_len, msg_len;

EXEC SQL WHENEVER SQLERROR CONTINUE;

printf("%s\n", msg);
buf_len = sizeof (err_msg);
sqlglm(err_msg, &buf_len, &msg_len);

if (msg_len > buf_len)
msg_len = buf_len;

printf("%.*s\n", msg_len, err_msg);

EXEC SQL ROLLBACK RELEASE;

exit(1);
}

Save this file and then let the precompiler to create from the hellodb.pc file the hellodb.c file, typing:
proc iname=hellodb.pc MODE=ORACLE

If you type
more hellodb.c
you will see something like the following code:

/* Result Sets Interface */
#ifndef SQL_CRSR
# define SQL_CRSR
struct sql_cursor
{
unsigned int curocn;
void *ptr1;
void *ptr2;
unsigned int magic;
};
typedef struct sql_cursor sql_cursor;
typedef struct sql_cursor SQL_CURSOR;
#endif /* SQL_CRSR */

/* Thread Safety */
typedef void * sql_context;
typedef void * SQL_CONTEXT;

/* Object support */
struct sqltvn
{
unsigned char *tvnvsn;
unsigned short tvnvsnl;
unsigned char *tvnnm;
unsigned short tvnnml;
unsigned char *tvnsnm;
unsigned short tvnsnml;
};
typedef struct sqltvn sqltvn;

struct sqladts
{
unsigned int adtvsn;
unsigned short adtmode;
unsigned short adtnum;
sqltvn adttvn[1];
};
typedef struct sqladts sqladts;

static struct sqladts sqladt = {
1,1,0,
};

/* Binding to PL/SQL Records */
struct sqltdss
{
unsigned int tdsvsn;
unsigned short tdsnum;
unsigned char *tdsval[1];
};
typedef struct sqltdss sqltdss;
static struct sqltdss sqltds =
{
1,
0,
};

/* File name & Package Name */
struct sqlcxp
{
unsigned short fillen;
char filnam[11];
};
static struct sqlcxp sqlfpn =
{
10,
"hellodb.pc"
};


static unsigned int sqlctx = 73675;


static struct sqlexd {
unsigned int sqlvsn;
unsigned int arrsiz;
unsigned int iters;
unsigned int offset;
unsigned short selerr;
unsigned short sqlety;
unsigned int occurs;
short *cud;
unsigned char *sqlest;
char *stmt;
sqladts *sqladtp;
sqltdss *sqltdsp;
void **sqphsv;
unsigned int *sqphsl;
int *sqphss;
void **sqpind;
int *sqpins;
unsigned int *sqparm;
unsigned int **sqparc;
unsigned short *sqpadto;
unsigned short *sqptdso;
unsigned int sqlcmax;
unsigned int sqlcmin;
unsigned int sqlcincr;
unsigned int sqlctimeout;
unsigned int sqlcnowait;
int sqfoff;
unsigned int sqcmod;
unsigned int sqfmod;
void *sqhstv[4];
unsigned int sqhstl[4];
int sqhsts[4];
void *sqindv[4];
int sqinds[4];
unsigned int sqharm[4];
unsigned int *sqharc[4];
unsigned short sqadto[4];
unsigned short sqtdso[4];
} sqlstm = {12,4};

/* SQLLIB Prototypes */
extern sqlcxt (/*_ void **, unsigned int *,
struct sqlexd *, struct sqlcxp * _*/);
extern sqlcx2t(/*_ void **, unsigned int *,
struct sqlexd *, struct sqlcxp * _*/);
extern sqlbuft(/*_ void **, char * _*/);
extern sqlgs2t(/*_ void **, char * _*/);
extern sqlorat(/*_ void **, unsigned int *, void * _*/);

/* Forms Interface */
static int IAPSUCC = 0;
static int IAPFAIL = 1403;
static int IAPFTL = 535;
extern void sqliem(/*_ char *, int * _*/);

typedef struct { unsigned short len; unsigned char arr[1]; } VARCHAR;
typedef struct { unsigned short len; unsigned char arr[1]; } varchar;

/* CUD (Compilation Unit Data) Array */
static short sqlcud0[] =
{12,4130,1,0,0,
5,0,0,1,0,0,27,20,0,0,4,4,0,1,0,1,97,0,0,1,97,0,0,1,10,0,0,1,10,0,0,
36,0,0,2,50,0,3,22,0,0,0,0,0,1,0,
51,0,0,3,0,0,29,26,0,0,0,0,0,1,0,
66,0,0,4,53,0,4,28,0,0,1,0,0,1,0,2,97,0,0,
85,0,0,5,0,0,32,50,0,0,0,0,0,1,0,
};


#include <stdio.h>

#include <sqlca.h>
#include <sqlcpr.h>
#include <oraca.h>
#include <sqlda.h>

/* Declare error handling function. */
void sql_error();

int main(int argc, char** argv)
{
char user[]="hello";
char pwd[]="hello";
char msg_buf[51]="";

/* Register sql_error() as the error handler. */
/* EXEC SQL WHENEVER SQLERROR DO sql_error("ORACLE error--\n"); */


/* EXEC SQL CONNECT :user IDENTIFIED BY :pwd; */

{
struct sqlexd sqlstm;
sqlstm.sqlvsn = 12;
sqlstm.arrsiz = 4;
sqlstm.sqladtp = &sqladt;
sqlstm.sqltdsp = &sqltds;
sqlstm.iters = (unsigned int )10;
sqlstm.offset = (unsigned int )5;
sqlstm.cud = sqlcud0;
sqlstm.sqlest = (unsigned char *)&sqlca;
sqlstm.sqlety = (unsigned short)256;
sqlstm.occurs = (unsigned int )0;
sqlstm.sqhstv[0] = ( void *)user;
sqlstm.sqhstl[0] = (unsigned int )0;
sqlstm.sqhsts[0] = ( int )0;
sqlstm.sqindv[0] = ( void *)0;
sqlstm.sqinds[0] = ( int )0;
sqlstm.sqharm[0] = (unsigned int )0;
sqlstm.sqadto[0] = (unsigned short )0;
sqlstm.sqtdso[0] = (unsigned short )0;
sqlstm.sqhstv[1] = ( void *)pwd;
sqlstm.sqhstl[1] = (unsigned int )0;
sqlstm.sqhsts[1] = ( int )0;
sqlstm.sqindv[1] = ( void *)0;
sqlstm.sqinds[1] = ( int )0;
sqlstm.sqharm[1] = (unsigned int )0;
sqlstm.sqadto[1] = (unsigned short )0;
sqlstm.sqtdso[1] = (unsigned short )0;
sqlstm.sqphsv = sqlstm.sqhstv;
sqlstm.sqphsl = sqlstm.sqhstl;
sqlstm.sqphss = sqlstm.sqhsts;
sqlstm.sqpind = sqlstm.sqindv;
sqlstm.sqpins = sqlstm.sqinds;
sqlstm.sqparm = sqlstm.sqharm;
sqlstm.sqparc = sqlstm.sqharc;
sqlstm.sqpadto = sqlstm.sqadto;
sqlstm.sqptdso = sqlstm.sqtdso;
sqlstm.sqlcmax = (unsigned int )100;
sqlstm.sqlcmin = (unsigned int )2;
sqlstm.sqlcincr = (unsigned int )1;
sqlstm.sqlctimeout = (unsigned int )0;
sqlstm.sqlcnowait = (unsigned int )0;
sqlcxt((void **)0, &sqlctx, &sqlstm, &sqlfpn);
if (sqlca.sqlcode <>
}


/* EXEC SQL
INSERT INTO hello_world
VALUES (1, 'Hello world!'); */

{
struct sqlexd sqlstm;
sqlstm.sqlvsn = 12;
sqlstm.arrsiz = 4;
sqlstm.sqladtp = &sqladt;
sqlstm.sqltdsp = &sqltds;
sqlstm.stmt = "insert into hello_world values (1,'Hello world!')";
sqlstm.iters = (unsigned int )1;
sqlstm.offset = (unsigned int )36;
sqlstm.cud = sqlcud0;
sqlstm.sqlest = (unsigned char *)&sqlca;
sqlstm.sqlety = (unsigned short)256;
sqlstm.occurs = (unsigned int )0;
sqlcxt((void **)0, &sqlctx, &sqlstm, &sqlfpn);
if (sqlca.sqlcode <>
}


/* EXEC SQL COMMIT; */

{
struct sqlexd sqlstm;
sqlstm.sqlvsn = 12;
sqlstm.arrsiz = 4;
sqlstm.sqladtp = &sqladt;
sqlstm.sqltdsp = &sqltds;
sqlstm.iters = (unsigned int )1;
sqlstm.offset = (unsigned int )51;
sqlstm.cud = sqlcud0;
sqlstm.sqlest = (unsigned char *)&sqlca;
sqlstm.sqlety = (unsigned short)256;
sqlstm.occurs = (unsigned int )0;
sqlcxt((void **)0, &sqlctx, &sqlstm, &sqlfpn);
if (sqlca.sqlcode <>
}


/* EXEC SQL
SELECT msg
INTO :msg_buf
FROM hello_world
WHERE rownum <= 1; */

{
struct sqlexd sqlstm;
sqlstm.sqlvsn = 12;
sqlstm.arrsiz = 4;
sqlstm.sqladtp = &sqladt;
sqlstm.sqltdsp = &sqltds;
sqlstm.stmt = "select msg into :b0 from hello_world where rownum<=1";
sqlstm.iters = (unsigned int )1;
sqlstm.offset = (unsigned int )66;
sqlstm.selerr = (unsigned short)1;
sqlstm.cud = sqlcud0;
sqlstm.sqlest = (unsigned char *)&sqlca;
sqlstm.sqlety = (unsigned short)256;
sqlstm.occurs = (unsigned int )0;
sqlstm.sqhstv[0] = ( void *)msg_buf;
sqlstm.sqhstl[0] = (unsigned int )51;
sqlstm.sqhsts[0] = ( int )0;
sqlstm.sqindv[0] = ( void *)0;
sqlstm.sqinds[0] = ( int )0;
sqlstm.sqharm[0] = (unsigned int )0;
sqlstm.sqadto[0] = (unsigned short )0;
sqlstm.sqtdso[0] = (unsigned short )0;
sqlstm.sqphsv = sqlstm.sqhstv;
sqlstm.sqphsl = sqlstm.sqhstl;
sqlstm.sqphss = sqlstm.sqhsts;
sqlstm.sqpind = sqlstm.sqindv;
sqlstm.sqpins = sqlstm.sqinds;
sqlstm.sqparm = sqlstm.sqharm;
sqlstm.sqparc = sqlstm.sqharc;
sqlstm.sqpadto = sqlstm.sqadto;
sqlstm.sqptdso = sqlstm.sqtdso;
sqlcxt((void **)0, &sqlctx, &sqlstm, &sqlfpn);
if (sqlca.sqlcode <>
}


printf("%s\n", msg_buf);
return(0);
}

void sql_error(char *msg)
{
char err_msg[128];
int buf_len, msg_len;

/* EXEC SQL WHENEVER SQLERROR CONTINUE; */

printf("\n%s\n", msg);
buf_len = sizeof (err_msg);
sqlglm(err_msg, &buf_len, &msg_len);
if (msg_len > buf_len)
msg_len = buf_len;
printf("%.*s\n", msg_len, err_msg);
/* EXEC SQL ROLLBACK RELEASE; */

{
struct sqlexd sqlstm;
sqlstm.sqlvsn = 12;
sqlstm.arrsiz = 4;
sqlstm.sqladtp = &sqladt;
sqlstm.sqltdsp = &sqltds;
sqlstm.iters = (unsigned int )1;
sqlstm.offset = (unsigned int )85;
sqlstm.cud = sqlcud0;
sqlstm.sqlest = (unsigned char *)&sqlca;
sqlstm.sqlety = (unsigned short)256;
sqlstm.occurs = (unsigned int )0;
sqlcxt((void **)0, &sqlctx, &sqlstm, &sqlfpn);
}
exit(1);
}

Now you have just to use the gcc compiler to create your executable, simply typing:
gcc hellodb.c -I/u01/app/oracle/product/10.2.0/db_1/precomp/public/ /u01/app/oracle/product/10.2.0/db_1/lib/libclntsh.so -o hellodb
Run your executable in this way:
./hellodb

What does the hellodb executable do ?

It connects to your ORACLE_SID database using the user hello and the password hello.
Then it inserts a row with the message "Hello world!" into the table hello_world and commits your work.
After it asks for the FIRST row from the hello_world table and puts the result in the buffer msg_buf and, at last, it prints on the standard output that message.
That's all...

Recovery Manager: 02 Connecting to target and catalog database

Click here to read the previous step

To connect to the target database you have to set at least the ORACLE_SID variable for your Unix environment.
Moreover you can connect to the target database using RMAN only if you have the SYSDBA privilege granted, otherwise an error message will be showed:

$ rman

RMAN> connect target;

RMAN-00571: ==========================================
RMAN-00569: ======= ERROR MESSAGE STACK FOLLOWS ============
RMAN-00571: ==========================================
ORA-01031: insufficient privileges

RMAN> exit
As usual two methods are used to have the SYSDBA privilege, via local OS authentication or via remote password file.
We will use our local OS authentication so RMAN enables you to automatically connects to the target database with the SYSDBA privilege.

To connect to a target database using O/S authentication, use the following command:
$ rman target / nocatalog

Recovery Manager: Release 10.2.0.1.0 - Production on Wed Apr 4 01:21:58 2007

Copyright (c) 1982, 2005, Oracle. All rights reserved.

connected to target database: PRIMARY (DBID=1453964262)
using target database control file instead of recovery catalog

RMAN>exit
As RMAN says you are using the target database controlfile instead of a recovery catalog database.
nocatalog is the default option, so the following command will connect again to the target database controlfile:
$ rman target /

Recovery Manager: Release 10.2.0.1.0 - Production on Wed Apr 4 01:22:59 2007

Copyright (c) 1982, 2005, Oracle. All rights reserved.

connected to target database: PRIMARY (DBID=1453964262)

RMAN>exit
To connect to a target database using O/S authentication and to a remote recovery catalog database, use the following command:
$ rman target / catalog rmadmin/rmadmin@catdb
In a production environment your connection to the catalog usually should be through a network connection and should never reside on the same host as your target database, otherwise you could have a single point of failure and lost at the same time your target database and the information to recover it, saved in your recovery catalog database.

A good practice is to use the connect commands from within RMAN when you connect to remote target or recovery catalog database.
In this way you prevent other users to view the passwords from appearing in the process list, for example instead of use the following command:
$rman target sys/oracle@primary

You should use the following commands:
$rman

RMAN>connect target sys/oracle@tgtdb
In the first way, a user can get your password simply typing:
# ps -ef|grep rman
oracle 5781 4234 14 02:07 pts/4 00:00:01 rman target sys/oracle
oracle 5792 3498 0 02:07 pts/1 00:00:00 grep rman
Click here to read the next step

Wednesday, April 4, 2007

Recovery Manager: 01 general introduction

Recovery Manager is the Oracle utility that can manage all of your Oracle backup and can help you to perform recovery.
Yes, I know your scripts are still working and will continue to work, but what about the benefits that RMAN comes with ?

With RMAN you can perform activities that are not available with your scripts...
I mean incremental backups... with RMAN you can copy data blocks that have changed since the last backup and those only;
I mean true parallelization of your backups, just granted configuring and using I/O channels;
I mean compressed backup set compared with image copies, how much space on your file system will you save ?;
I mean no extra redo log generation during online backups;
I mean detection of corrupt blocks during backups;
I mean REPORT and LIST commands to know what backup are available...;
I mean stored catalog RMAN scripts to automize your backup... yes just like your shell scripts!!!.

The RMAN environments is composed by:
1) the rman utility;
2) background server processes started by RMAN when you connect to the target database, or
when you connect to the recovery catalog database or when you use I/O channels;
3) the I/O channel, a server process useful to read and write the RMAN backup;
4) the target database, namely the database that you want backup or recovery;
5) the recovery catalog database, an optional database used to maintain and preserve backup and recovery informations executed on the target database. Note that the recovery catalog database preserves only information about the backups and recoveries of the target database and not the physical backup files themselves. In the recovery catalog database you can also save your RMAN scripts. Every single catalog schema is about 200 MB;
6) the media management layer, useful to manage datas to and from tape, provided by third-party company;
7) the backup set, logical collection of files associated with a backup, composed of one or more physical file called backup pieces.

Click here to read the next step.

Thursday, March 8, 2007

Oracle Data Guard: 02 physical standby database configuration

Click here to read the previous post

After the installation of the Oracle sw on the primary database, the first step is to create a password file on every database in the Data Guard configuration using the same identical sys user and password, so the log transport services can correctly work.
First look into the $ORACLE_HOME/dbs directory and search for an existing password file. In my virtual linux machine the orapwDGUARD file already exists and also the parameter remote_login_passwordfile is correctly set to EXCLUSIVE mode (see the picture below).

SQL> show parameter remote_login_

NAME TYPE VALUE
------------------------------------ ----------- ------------------------------
remote_login_passwordfile string EXCLUSIVE


If you don't have a password file, execute these step:

$cd $ORACLE_HOME/dbs
$orapwd file=orapwDGUARD password=your_password

The orapw file must have the following name: orapwSID (and SID is equal to DGUARD in my case).
Then you must set the remote_login_passwordfile parameter in the spfile while the database is in the nomount state:

shutdown immediate;
startup nomount;
alter system set remote_login_passwordfile=exclusive scope=spfile;
alter database open;

When you will install the Oracle software on the standby machine you simply will be able to copy the orapwDGUARD password file to the standby machine to use the same identical sys user and password and let the log transport services work correctly.

The next step is to enable force logging. This step is not mandatory but you must kwow that any nologging operations performed on the primary won't be logged into the redo stream. So if you place the primary database into force logging mode, nologging operations are still permitted, but the changes are also written into the redo stream and the disaster recovery solution is maintained.
You can place the primary database in forced logging mode, issuing the following command with sysdba privilege (see the picture below):

alter database force logging;


Even if it's not mandatory (in very truth it's mandatory in maximum protection and maximum availability modes, but
I'm configuring maximum performance mode and in this case is optional), to make role transitions easier and faster,
it's a good practice to create the standby redo logs on both the databases (primary and standby).

First of all I see how many kilobytes are my redo log groups formed by:
SQL> SELECT GROUP#, THREAD#, BYTES/1024 FROM V$LOG;

GROUP# THREAD# BYTES/1024
---------- ---------- ----------
1 1 51200
2 1 51200

Oracle suggests to have at least one more standby redo log file group than
the number of online redo log file groups on the primary database.
I have two online redo log file groups, so I've to create three standby redo log file groups (see the picture below), typing:

ALTER DATABASE ADD STANDBY LOGFILE GROUP 3 ('/u01/app/oracle/oradata/DGUARD/sredolog03.log') SIZE 51200K;
ALTER DATABASE ADD STANDBY LOGFILE GROUP 4 ('/u01/app/oracle/oradata/DGUARD/sredolog04.log') SIZE 51200K;
ALTER DATABASE ADD STANDBY LOGFILE GROUP 5 ('/u01/app/oracle/oradata/DGUARD/sredolog05.log') SIZE 51200K;


In the following picture you can see the list of the $ORACLE_BASE/oradata/DGUARD/ directory:


The next step is to configure the initialization parameters of the primary database.
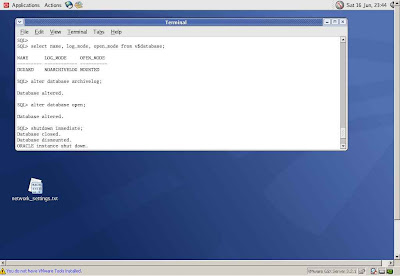
It's important to configure the parameters to control log transport services and log apply services useful during future role transitions.
The standby parameters are not read, while I use the primary control file; they are put into effect only when a role transition happens.

I have to obtain at least the following parameters:
## Primary Role Parameters ##
## DB_UNIQUE_NAME is the parameter the identify your role
## DB_NAME equal to DGUARD both on the primary and on the standby databases, is used only to preserve the same location of
## the oracle files, under the directory $ORACLE_BASE/oradata/DGUARD/
DB_UNIQUE_NAME=PRIMARY
SERVICE_NAMES=PRIMARY
LOG_ARCHIVE_CONFIG='DG_CONFIG=(PRIMARY,STANDBY)'
LOG_ARCHIVE_DEST_1='LOCATION=USE_DB_RECOVERY_FILE_DEST VALID_FOR=(ALL_LOGFILES,ALL_ROLES) DB_UNIQUE_NAME=PRIMARY'
LOG_ARCHIVE_DEST_2='SERVICE=STANDBY LGWR ASYNC VALID_FOR=(ONLINE_LOGFILES,PRIMARY_ROLE) DB_UNIQUE_NAME=STANDBY'
LOG_ARCHIVE_DEST_STATE_1=ENABLE
#Initially I decide to defer this paraemter, unless I complete the standby configuration.
LOG_ARCHIVE_DEST_STATE_2=DEFER
## Standby Role Parameters ##
## In this example I don't need to use the following parameters
## DB_FILE_NAME_CONVERT=('PRIMARY','STANDBY')
## LOG_FILE_NAME_CONVERT=('PRIMARY','STANDBY')
STANDBY_FILE_MANAGEMENT=AUTO
FAL_SERVER=STANDBY_macbook2
FAL_CLIENT=PRIMARY_macbook1

Here is MY initDGUARD.ora file presents at the time of my configuration, before creating the spfile and before enable the log_archive_dest_state_2 parameter:
DGUARD.__db_cache_size=79691776
DGUARD.__java_pool_size=4194304
DGUARD.__large_pool_size=4194304
DGUARD.__shared_pool_size=75497472
DGUARD.__streams_pool_size=0
*.audit_file_dest='/u01/app/oracle/admin/DGUARD/adump'
*.background_dump_dest='/u01/app/oracle/admin/DGUARD/bdump'
*.compatible='10.2.0.1.0'
*.control_files='/u01/app/oracle/oradata/DGUARD/control01.ctl','/u01/app/oracle/oradata/DGUARD/control02.ctl','/u01/app/oracle/oradata/DGUARD/control03.ctl'
*.core_dump_dest='/u01/app/oracle/admin/DGUARD/cdump'
*.db_block_size=8192
*.db_domain=''
*.db_file_multiblock_read_count=16
*.db_name='DGUARD'
*.db_recovery_file_dest='/u01/app/oracle/flash_recovery_area'
*.db_recovery_file_dest_size=1073741824
*.db_unique_name='PRIMARY'
*.dispatchers='(PROTOCOL=TCP) (SERVICE=DGUARDXDB)'
*.fal_client='PRIMARY_MACBOOK1'
*.fal_server='STANDBY_MACBOOK2'
*.job_queue_processes=10
*.log_archive_config='DG_CONFIG=(PRIMARY,STANDBY)'
*.log_archive_dest_1='LOCATION=USE_DB_RECOVERY_FILE_DEST VALID_FOR=(ALL_LOGFILES,ALL_ROLES) DB_UNIQUE_NAME=PRIMARY'
*.log_archive_dest_2='SERVICE=STANDBY VALID_FOR=(ONLINE_LOGFILES,PRIMARY_ROLE) DB_UNIQUE_NAME=STANDBY'
*.log_archive_dest_state_1='ENABLE'
*.log_archive_dest_state_2='DEFER'
*.open_cursors=300
*.pga_aggregate_target=16777216
*.processes=150
*.remote_login_passwordfile='EXCLUSIVE'
*.service_names='PRIMARY'
*.sga_target=167772160
*.standby_file_management='AUTO'
*.undo_management='AUTO'
*.undo_tablespace='UNDOTBS1'
*.user_dump_dest='/u01/app/oracle/admin/DGUARD/udump'

I can use Enterprise Manager or show parameter to obtain the current value and eventually modify it.
I typed (see the picture below):
alter system set service_names=PRIMARY;
alter system set db_unique_name=PRIMARY scope=spfile;
alter system set LOG_ARCHIVE_CONFIG='DG_CONFIG=(PRIMARY,STANDBY)' scope=spfile;
alter system set LOG_ARCHIVE_DEST_1='LOCATION=USE_DB_RECOVERY_FILE_DEST VALID_FOR=(ALL_LOGFILES,ALL_ROLES) DB_UNIQUE_NAME=PRIMARY' scope=spfile;
alter system set LOG_ARCHIVE_DEST_2='SERVICE=STANDBY LGWR ASYNC VALID_FOR=(ONLINE_LOGFILES,PRIMARY_ROLE) DB_UNIQUE_NAME=STANDBY' scope=spfile;
alter system set LOG_ARCHIVE_DEST_STATE_1=ENABLE scope=spfile;
alter system set LOG_ARCHIVE_DEST_STATE_2=DEFER scope=spfile;
alter system set STANDBY_FILE_MANAGEMENT=AUTO scope=spfile;
alter system set FAL_SERVER=STANDBY_macbook2 scope=spfile;
alter system set FAL_CLIENT=PRIMARY_macbook1 scope=spfile;


In the picture below you can see the configuration of the FAL_SERVER and the FAL_CLIENT parameters:


Redo logs are important so the primary database must be in archivelog mode.
During the database installation I have choose to set the database in noarchivelog mode, in fact if I type:

SQL> select name, log_mode, open_mode from V$DATABASE;

NAME LOG_MODE OPEN_MODE
--------- ------------ ---------
DGUARD NOARCHIVELOG MOUNTED

So I must now set the database in archivelog mode in this way, using sysdba privilege (see the picture below):

shutdown immediate;
startup mount;
alter database archivelog;
alter database open;


Now I have to create the environment for the standby database.
So I start the second virtual machine (Standby) that I configured just like this step,
download the Oracle 10g Database from Oracle website and extract the zip file.
Launch the runInstaller as usual, select Advanced Installation from the Select Installation Method screen and click
NEXT untill the Select Configuration Option screen appears. From this screen select Install database Software only and click NEXT, untill the setup process doesn't finish successfully.

At this point I can create the necessary directories for the standby database.
As oracle user type (see the picture below):
cd $ORACLE_BASE
mkdir -p oradata/DGUARD
mkdir -p flash_recovery_area/DGUARD/onlinelog
mkdir -p admin/DGUARD/adump
mkdir -p admin/DGUARD/bdump
mkdir -p admin/DGUARD/cdump
mkdir -p admin/DGUARD/dpdump
mkdir -p admin/DGUARD/pfile
mkdir -p admin/DGUARD/udump


The next step is to get the necessary files of the primary database that will be used
later by the physical standby database.
I have to make a backup of the primary database, and I will not use RMAN but rather I will use
scp to copy all the necessary files from the primary database to the remote standby database.
Remember to type the oracle password when asked, using the scp command.
These are the commands I typed while the database was closed, I mean... use "shutdown immediate" (see the picture below):

$ cd $ORACLE_BASE/oradata/DGUARD/
$ ls
control01.ctl control03.ctl redo01.log sredolog03.log sredolog05.log system01.dbf undotbs01.dbf
control02.ctl example01.dbf redo02.log sredolog04.log sysaux01.dbf temp01.dbf users01.dbf
$ ping -c 1 macbook2
PING macbook2 (192.168.0.11) 56(84) bytes of data.
64 bytes from macbook2 (192.168.0.11): icmp_seq=0 ttl=64 time=1.31 ms

--- macbook2 ping statistics ---
1 packets transmitted, 1 received, 0% packet loss, time 6ms
rtt min/avg/max/mdev = 1.311/1.311/1.311/0.000 ms, pipe 2
$ scp example01.dbf oracle@macbook2:/u01/app/oracle/oradata/DGUARD/example01.dbf
oracle@macbook2's password:
example01.dbf 100% 100MB 3.2MB/s 00:31
$ scp redo01.log oracle@macbook2:/u01/app/oracle/oradata/DGUARD/redo01.log
oracle@macbook2's password:
redo01.log 100% 50MB 3.1MB/s 00:16
$ scp redo02.log oracle@macbook2:/u01/app/oracle/oradata/DGUARD/redo02.log
oracle@macbook2's password:
redo02.log 100% 50MB 2.6MB/s 00:19
$ scp sredolog03.log oracle@macbook2:/u01/app/oracle/oradata/DGUARD/sredolog03.log
oracle@macbook2's password:
sredolog03.log 100% 50MB 2.8MB/s 00:18
$ scp sredolog04.log oracle@macbook2:/u01/app/oracle/oradata/DGUARD/sredolog04.log
oracle@macbook2's password:
sredolog04.log 100% 50MB 2.6MB/s 00:19
$ scp sredolog05.log oracle@macbook2:/u01/app/oracle/oradata/DGUARD/sredolog05.log
oracle@macbook2's password:
sredolog05.log 100% 50MB 3.9MB/s 00:13
$ scp sysaux01.dbf oracle@macbook2:/u01/app/oracle/oradata/DGUARD/sysaux01.dbf
oracle@macbook2's password:
sysaux01.dbf 100% 230MB 4.7MB/s 00:49
$ scp system01.dbf oracle@macbook2:/u01/app/oracle/oradata/DGUARD/system01.dbf
oracle@macbook2's password:
system01.dbf 100% 480MB 5.4MB/s 01:29
$ scp temp01.dbf oracle@macbook2:/u01/app/oracle/oradata/DGUARD/temp01.dbf
oracle@macbook2's password:
temp01.dbf 100% 21MB 2.3MB/s 00:09
$ scp undotbs01.dbf oracle@macbook2:/u01/app/oracle/oradata/DGUARD/undotbs01.dbf
oracle@macbook2's password:
undotbs01.dbf 100% 30MB 3.3MB/s 00:09
$ scp users01.dbf oracle@macbook2:/u01/app/oracle/oradata/DGUARD/users01.dbf
oracle@macbook2's password:
users01.dbf 100% 5128KB 5.0MB/s 00:01


In the picture below you can see the scp command on temp01.dbf, undotbs01.dbf and users01.dbf datafiles:


I have to obtain the init parameter from the spfile of the primary database (see the picture below):
create pfile from spfile;
it will be created into the $ORACLE_HOME/dbs location.

I have to create also the standby control file:
ALTER DATABASE CREATE STANDBY CONTROLFILE AS '/u01/app/oracle/oradata/PRIMARY/standby_control01.ctl';


Copy also these files and the orapwDGUARD file from primary database machine (named Primary) to the standby database machine
(named Standby)
As oracle user type:
cd $ORACLE_HOME/dbs
scp initDGUARD.ora oracle@macbook2:/u01/app/oracle/product/10.2.0/db_1/dbs/initDGUARD.ora
(type the oracle password when asked)
cd $ORACLE_BASE/oradata/PRIMARY/
scp standby_control01.ctl oracle@guard.dataguard.com:/u01/app/oracle/oradata/STANDBY/standby_control01.ctl
(type the oracle password when asked)
Repeat this step for every file existing in the $ORACLE_BASE/oradata/DGUARD/ directory.

$ scp standby_control01.ctl oracle@macbook2:/u01/app/oracle/oradata/DGUARD/standby_control01.ctl
oracle@macbook2's password:
standby_control01.ctl 100% 6896KB 3.4MB/s 00:02
$ scp /u01/app/oracle/product/10.2.0/db_1/dbs/initDGUARD.ora oracle@macbook2:/u01/app/oracle/product/10.2.0/db_1/dbs/initDGUARD.ora
oracle@macbook2's password:
initDGUARD.ora 100% 1510 1.5KB/s 00:00
$ scp orapwDGUARD oracle@macbook2:/u01/app/oracle/product/10.2.0/db_1/dbs/orapwDGUARD
oracle@macbook2's password:
orapwDGUARD 100% 1536 1.5KB/s 00:00


On the standby machine, edit the initDGUARD.ora initialization parameter file that you have copied from primary database into the directory $ORACLE_HOME/dbs/ as in the following example:

DB_UNIQUE_NAME=STANDBY
SERVICE_NAMES=STANDBY
LOG_ARCHIVE_CONFIG='DG_CONFIG=(PRIMARY,STANDBY)'
LOG_ARCHIVE_DEST_1='LOCATION=USE_DB_RECOVERY_FILE_DEST VALID_FOR=(ALL_LOGFILES,ALL_ROLES) DB_UNIQUE_NAME=STANDBY'
LOG_ARCHIVE_DEST_2='SERVICE=PRIMARY LGWR ASYNC VALID_FOR=(ONLINE_LOGFILES,PRIMARY_ROLE) DB_UNIQUE_NAME=PRIMARY'
LOG_ARCHIVE_DEST_STATE_1=ENABLE
LOG_ARCHIVE_DEST_STATE_2=ENABLE
## Standby Role Parameters ##
STANDBY_FILE_MANAGEMENT=AUTO
FAL_SERVER=PRIMARY_macbook1
FAL_CLIENT=STANDBY_macbook2

Remember to edit also the following line:
*.control_files='/u01/app/oracle/oradata/DGUARD/standby_control01.ctl','/u01/app/oracle/oradata/DGUARD/standby_control02.ctl','/u01/app/oracle/oradata/DGUARD/standby_control03.ctl'

Then go to the directory $ORACLE_BASE/oradata/DGUARD/ and type the following commands to multiplex your standby control files:
$ cp standby_control01.ctl standby_control02.ctl
$ cp standby_control01.ctl standby_control03.ctl

DON'T change the value of the parameter DB_NAME='DGUARD' into DB_NAME='STANDBY' (you are using the control file provided by primary database and in that file there's written that the database name is DGUARD and not STANDBY.)
Just add DB_UNIQUE_NAME=STANDBY in the standby pfile.

Then, from the standby database machine, type as oracle user (see the picture below):
sqlplus "/ as sysdba"
create spfile from pfile='initDGUARD.ora'
startup mount;


Now it's time to configure the listeners and the net services names... that is ... create the file listener.ora and
tnsnames.ora on both the databases into the directory $ORACLE_HOME/network/admin/
Before, because I experienced problems make sure the loopback entry in /etc/hosts is not missing when you start the listener:
127.0.0.1 localhost

and make sure you have the libaio-devel package installed on both machine.
On hostname macbook1 type as root user (see the picture below):
rpm -q libaio-devel
and eventually install the package mounting the ISO 3
rpm -Uvh libaio-devel-0.3.105-2.i386.rpm


On macbook2 type as root user (see the picture below):
rpm -q libaio-devel
and eventually install the package mounting the ISO 3
rpm -Uvh libaio-devel-0.3.105-2.i386.rpm


Create the following listener.ora file into the directory $ORACLE_HOME/network/admin/ of the primary machine (see the picture below):
# listener.ora Network Configuration File: /u01/app/oracle/product/10.2.0/db_1/network/admin/listener.ora
# Generated by Oracle configuration tools.

LISTENER =
(DESCRIPTION_LIST =
(DESCRIPTION =
(ADDRESS = (PROTOCOL = TCP)(HOST = macbook1)(PORT = 1521))
)
)

Create the following tnsnames.ora file into the directory $ORACLE_HOME/network/admin/ of the primary machine (macbook1 has 192.168.0.10 as static IP, macbook2 has 192.168.0.11 as static IP):
# tnsnames.ora Network Configuration File: /u01/app/oracle/product/10.2.0/db_1/network/admin/tnsnames.ora
# Generated by Oracle configuration tools.

STANDBY_MACBOOK2 =
(DESCRIPTION =
(ADDRESS_LIST =
(ADDRESS = (PROTOCOL = TCP)(HOST = 192.168.0.11)(PORT = 1521))
)
(CONNECT_DATA =
(SERVICE_NAME = STANDBY)
)
)


Create the following listener.ora file into the directory $ORACLE_HOME/network/admin/ of the standby machine (see the picture below):
# listener.ora Network Configuration File: /u01/app/oracle/product/10.2.0/db_1/network/admin/listener.ora
# Generated by Oracle configuration tools.

LISTENER =
(DESCRIPTION_LIST =
(DESCRIPTION =
(ADDRESS = (PROTOCOL = TCP)(HOST = macbook2)(PORT = 1521))
)
)

Create the following tnsnames.ora file into the directory $ORACLE_HOME/network/admin/ of the standby machine (macbook1 has 192.168.0.10 as static IP, macbook2 has 192.168.0.11 as static IP):
# tnsnames.ora Network Configuration File: /u01/app/oracle/product/10.2.0/db_1/network/admin/tnsnames.ora
# Generated by Oracle configuration tools.

PRIMARY_MACBOOK1 =
(DESCRIPTION =
(ADDRESS_LIST =
(ADDRESS = (PROTOCOL = TCP)(HOST = 192.168.0.10)(PORT = 1521))
)
(CONNECT_DATA =
(SERVICE_NAME = STANDBY)
)
)


Click here to read the next post