Pages

Thursday, March 8, 2007

Oracle Data Guard: 02 physical standby database configuration

Click here to read the previous post

After the installation of the Oracle sw on the primary database, the first step is to create a password file on every database in the Data Guard configuration using the same identical sys user and password, so the log transport services can correctly work.
First look into the $ORACLE_HOME/dbs directory and search for an existing password file. In my virtual linux machine the orapwDGUARD file already exists and also the parameter remote_login_passwordfile is correctly set to EXCLUSIVE mode (see the picture below).

SQL> show parameter remote_login_

NAME TYPE VALUE
------------------------------------ ----------- ------------------------------
remote_login_passwordfile string EXCLUSIVE


If you don't have a password file, execute these step:

$cd $ORACLE_HOME/dbs
$orapwd file=orapwDGUARD password=your_password

The orapw file must have the following name: orapwSID (and SID is equal to DGUARD in my case).
Then you must set the remote_login_passwordfile parameter in the spfile while the database is in the nomount state:

shutdown immediate;
startup nomount;
alter system set remote_login_passwordfile=exclusive scope=spfile;
alter database open;

When you will install the Oracle software on the standby machine you simply will be able to copy the orapwDGUARD password file to the standby machine to use the same identical sys user and password and let the log transport services work correctly.

The next step is to enable force logging. This step is not mandatory but you must kwow that any nologging operations performed on the primary won't be logged into the redo stream. So if you place the primary database into force logging mode, nologging operations are still permitted, but the changes are also written into the redo stream and the disaster recovery solution is maintained.
You can place the primary database in forced logging mode, issuing the following command with sysdba privilege (see the picture below):

alter database force logging;


Even if it's not mandatory (in very truth it's mandatory in maximum protection and maximum availability modes, but
I'm configuring maximum performance mode and in this case is optional), to make role transitions easier and faster,
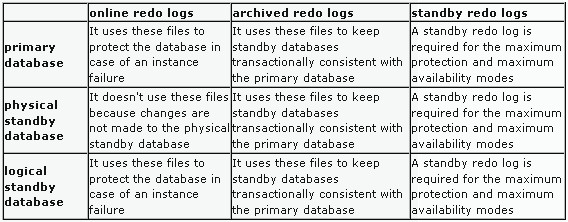
it's a good practice to create the standby redo logs on both the databases (primary and standby).

First of all I see how many kilobytes are my redo log groups formed by:
SQL> SELECT GROUP#, THREAD#, BYTES/1024 FROM V$LOG;

GROUP# THREAD# BYTES/1024
---------- ---------- ----------
1 1 51200
2 1 51200

Oracle suggests to have at least one more standby redo log file group than
the number of online redo log file groups on the primary database.
I have two online redo log file groups, so I've to create three standby redo log file groups (see the picture below), typing:

ALTER DATABASE ADD STANDBY LOGFILE GROUP 3 ('/u01/app/oracle/oradata/DGUARD/sredolog03.log') SIZE 51200K;
ALTER DATABASE ADD STANDBY LOGFILE GROUP 4 ('/u01/app/oracle/oradata/DGUARD/sredolog04.log') SIZE 51200K;
ALTER DATABASE ADD STANDBY LOGFILE GROUP 5 ('/u01/app/oracle/oradata/DGUARD/sredolog05.log') SIZE 51200K;


In the following picture you can see the list of the $ORACLE_BASE/oradata/DGUARD/ directory:


The next step is to configure the initialization parameters of the primary database.
It's important to configure the parameters to control log transport services and log apply services useful during future role transitions.
The standby parameters are not read, while I use the primary control file; they are put into effect only when a role transition happens.

I have to obtain at least the following parameters:
## Primary Role Parameters ##
## DB_UNIQUE_NAME is the parameter the identify your role
## DB_NAME equal to DGUARD both on the primary and on the standby databases, is used only to preserve the same location of
## the oracle files, under the directory $ORACLE_BASE/oradata/DGUARD/
DB_UNIQUE_NAME=PRIMARY
SERVICE_NAMES=PRIMARY
LOG_ARCHIVE_CONFIG='DG_CONFIG=(PRIMARY,STANDBY)'
LOG_ARCHIVE_DEST_1='LOCATION=USE_DB_RECOVERY_FILE_DEST VALID_FOR=(ALL_LOGFILES,ALL_ROLES) DB_UNIQUE_NAME=PRIMARY'
LOG_ARCHIVE_DEST_2='SERVICE=STANDBY LGWR ASYNC VALID_FOR=(ONLINE_LOGFILES,PRIMARY_ROLE) DB_UNIQUE_NAME=STANDBY'
LOG_ARCHIVE_DEST_STATE_1=ENABLE
#Initially I decide to defer this paraemter, unless I complete the standby configuration.
LOG_ARCHIVE_DEST_STATE_2=DEFER
## Standby Role Parameters ##
## In this example I don't need to use the following parameters
## DB_FILE_NAME_CONVERT=('PRIMARY','STANDBY')
## LOG_FILE_NAME_CONVERT=('PRIMARY','STANDBY')
STANDBY_FILE_MANAGEMENT=AUTO
FAL_SERVER=STANDBY_macbook2
FAL_CLIENT=PRIMARY_macbook1

Here is MY initDGUARD.ora file presents at the time of my configuration, before creating the spfile and before enable the log_archive_dest_state_2 parameter:
DGUARD.__db_cache_size=79691776
DGUARD.__java_pool_size=4194304
DGUARD.__large_pool_size=4194304
DGUARD.__shared_pool_size=75497472
DGUARD.__streams_pool_size=0
*.audit_file_dest='/u01/app/oracle/admin/DGUARD/adump'
*.background_dump_dest='/u01/app/oracle/admin/DGUARD/bdump'
*.compatible='10.2.0.1.0'
*.control_files='/u01/app/oracle/oradata/DGUARD/control01.ctl','/u01/app/oracle/oradata/DGUARD/control02.ctl','/u01/app/oracle/oradata/DGUARD/control03.ctl'
*.core_dump_dest='/u01/app/oracle/admin/DGUARD/cdump'
*.db_block_size=8192
*.db_domain=''
*.db_file_multiblock_read_count=16
*.db_name='DGUARD'
*.db_recovery_file_dest='/u01/app/oracle/flash_recovery_area'
*.db_recovery_file_dest_size=1073741824
*.db_unique_name='PRIMARY'
*.dispatchers='(PROTOCOL=TCP) (SERVICE=DGUARDXDB)'
*.fal_client='PRIMARY_MACBOOK1'
*.fal_server='STANDBY_MACBOOK2'
*.job_queue_processes=10
*.log_archive_config='DG_CONFIG=(PRIMARY,STANDBY)'
*.log_archive_dest_1='LOCATION=USE_DB_RECOVERY_FILE_DEST VALID_FOR=(ALL_LOGFILES,ALL_ROLES) DB_UNIQUE_NAME=PRIMARY'
*.log_archive_dest_2='SERVICE=STANDBY VALID_FOR=(ONLINE_LOGFILES,PRIMARY_ROLE) DB_UNIQUE_NAME=STANDBY'
*.log_archive_dest_state_1='ENABLE'
*.log_archive_dest_state_2='DEFER'
*.open_cursors=300
*.pga_aggregate_target=16777216
*.processes=150
*.remote_login_passwordfile='EXCLUSIVE'
*.service_names='PRIMARY'
*.sga_target=167772160
*.standby_file_management='AUTO'
*.undo_management='AUTO'
*.undo_tablespace='UNDOTBS1'
*.user_dump_dest='/u01/app/oracle/admin/DGUARD/udump'

I can use Enterprise Manager or show parameter to obtain the current value and eventually modify it.
I typed (see the picture below):
alter system set service_names=PRIMARY;
alter system set db_unique_name=PRIMARY scope=spfile;
alter system set LOG_ARCHIVE_CONFIG='DG_CONFIG=(PRIMARY,STANDBY)' scope=spfile;
alter system set LOG_ARCHIVE_DEST_1='LOCATION=USE_DB_RECOVERY_FILE_DEST VALID_FOR=(ALL_LOGFILES,ALL_ROLES) DB_UNIQUE_NAME=PRIMARY' scope=spfile;
alter system set LOG_ARCHIVE_DEST_2='SERVICE=STANDBY LGWR ASYNC VALID_FOR=(ONLINE_LOGFILES,PRIMARY_ROLE) DB_UNIQUE_NAME=STANDBY' scope=spfile;
alter system set LOG_ARCHIVE_DEST_STATE_1=ENABLE scope=spfile;
alter system set LOG_ARCHIVE_DEST_STATE_2=DEFER scope=spfile;
alter system set STANDBY_FILE_MANAGEMENT=AUTO scope=spfile;
alter system set FAL_SERVER=STANDBY_macbook2 scope=spfile;
alter system set FAL_CLIENT=PRIMARY_macbook1 scope=spfile;


In the picture below you can see the configuration of the FAL_SERVER and the FAL_CLIENT parameters:


Redo logs are important so the primary database must be in archivelog mode.
During the database installation I have choose to set the database in noarchivelog mode, in fact if I type:

SQL> select name, log_mode, open_mode from V$DATABASE;

NAME LOG_MODE OPEN_MODE
--------- ------------ ---------
DGUARD NOARCHIVELOG MOUNTED

So I must now set the database in archivelog mode in this way, using sysdba privilege (see the picture below):

shutdown immediate;
startup mount;
alter database archivelog;
alter database open;


Now I have to create the environment for the standby database.
So I start the second virtual machine (Standby) that I configured just like this step,
download the Oracle 10g Database from Oracle website and extract the zip file.
Launch the runInstaller as usual, select Advanced Installation from the Select Installation Method screen and click
NEXT untill the Select Configuration Option screen appears. From this screen select Install database Software only and click NEXT, untill the setup process doesn't finish successfully.

At this point I can create the necessary directories for the standby database.
As oracle user type (see the picture below):
cd $ORACLE_BASE
mkdir -p oradata/DGUARD
mkdir -p flash_recovery_area/DGUARD/onlinelog
mkdir -p admin/DGUARD/adump
mkdir -p admin/DGUARD/bdump
mkdir -p admin/DGUARD/cdump
mkdir -p admin/DGUARD/dpdump
mkdir -p admin/DGUARD/pfile
mkdir -p admin/DGUARD/udump


The next step is to get the necessary files of the primary database that will be used
later by the physical standby database.
I have to make a backup of the primary database, and I will not use RMAN but rather I will use
scp to copy all the necessary files from the primary database to the remote standby database.
Remember to type the oracle password when asked, using the scp command.
These are the commands I typed while the database was closed, I mean... use "shutdown immediate" (see the picture below):

$ cd $ORACLE_BASE/oradata/DGUARD/
$ ls
control01.ctl control03.ctl redo01.log sredolog03.log sredolog05.log system01.dbf undotbs01.dbf
control02.ctl example01.dbf redo02.log sredolog04.log sysaux01.dbf temp01.dbf users01.dbf
$ ping -c 1 macbook2
PING macbook2 (192.168.0.11) 56(84) bytes of data.
64 bytes from macbook2 (192.168.0.11): icmp_seq=0 ttl=64 time=1.31 ms

--- macbook2 ping statistics ---
1 packets transmitted, 1 received, 0% packet loss, time 6ms
rtt min/avg/max/mdev = 1.311/1.311/1.311/0.000 ms, pipe 2
$ scp example01.dbf oracle@macbook2:/u01/app/oracle/oradata/DGUARD/example01.dbf
oracle@macbook2's password:
example01.dbf 100% 100MB 3.2MB/s 00:31
$ scp redo01.log oracle@macbook2:/u01/app/oracle/oradata/DGUARD/redo01.log
oracle@macbook2's password:
redo01.log 100% 50MB 3.1MB/s 00:16
$ scp redo02.log oracle@macbook2:/u01/app/oracle/oradata/DGUARD/redo02.log
oracle@macbook2's password:
redo02.log 100% 50MB 2.6MB/s 00:19
$ scp sredolog03.log oracle@macbook2:/u01/app/oracle/oradata/DGUARD/sredolog03.log
oracle@macbook2's password:
sredolog03.log 100% 50MB 2.8MB/s 00:18
$ scp sredolog04.log oracle@macbook2:/u01/app/oracle/oradata/DGUARD/sredolog04.log
oracle@macbook2's password:
sredolog04.log 100% 50MB 2.6MB/s 00:19
$ scp sredolog05.log oracle@macbook2:/u01/app/oracle/oradata/DGUARD/sredolog05.log
oracle@macbook2's password:
sredolog05.log 100% 50MB 3.9MB/s 00:13
$ scp sysaux01.dbf oracle@macbook2:/u01/app/oracle/oradata/DGUARD/sysaux01.dbf
oracle@macbook2's password:
sysaux01.dbf 100% 230MB 4.7MB/s 00:49
$ scp system01.dbf oracle@macbook2:/u01/app/oracle/oradata/DGUARD/system01.dbf
oracle@macbook2's password:
system01.dbf 100% 480MB 5.4MB/s 01:29
$ scp temp01.dbf oracle@macbook2:/u01/app/oracle/oradata/DGUARD/temp01.dbf
oracle@macbook2's password:
temp01.dbf 100% 21MB 2.3MB/s 00:09
$ scp undotbs01.dbf oracle@macbook2:/u01/app/oracle/oradata/DGUARD/undotbs01.dbf
oracle@macbook2's password:
undotbs01.dbf 100% 30MB 3.3MB/s 00:09
$ scp users01.dbf oracle@macbook2:/u01/app/oracle/oradata/DGUARD/users01.dbf
oracle@macbook2's password:
users01.dbf 100% 5128KB 5.0MB/s 00:01


In the picture below you can see the scp command on temp01.dbf, undotbs01.dbf and users01.dbf datafiles:


I have to obtain the init parameter from the spfile of the primary database (see the picture below):
create pfile from spfile;
it will be created into the $ORACLE_HOME/dbs location.

I have to create also the standby control file:
ALTER DATABASE CREATE STANDBY CONTROLFILE AS '/u01/app/oracle/oradata/PRIMARY/standby_control01.ctl';


Copy also these files and the orapwDGUARD file from primary database machine (named Primary) to the standby database machine
(named Standby)
As oracle user type:
cd $ORACLE_HOME/dbs
scp initDGUARD.ora oracle@macbook2:/u01/app/oracle/product/10.2.0/db_1/dbs/initDGUARD.ora
(type the oracle password when asked)
cd $ORACLE_BASE/oradata/PRIMARY/
scp standby_control01.ctl oracle@guard.dataguard.com:/u01/app/oracle/oradata/STANDBY/standby_control01.ctl
(type the oracle password when asked)
Repeat this step for every file existing in the $ORACLE_BASE/oradata/DGUARD/ directory.

$ scp standby_control01.ctl oracle@macbook2:/u01/app/oracle/oradata/DGUARD/standby_control01.ctl
oracle@macbook2's password:
standby_control01.ctl 100% 6896KB 3.4MB/s 00:02
$ scp /u01/app/oracle/product/10.2.0/db_1/dbs/initDGUARD.ora oracle@macbook2:/u01/app/oracle/product/10.2.0/db_1/dbs/initDGUARD.ora
oracle@macbook2's password:
initDGUARD.ora 100% 1510 1.5KB/s 00:00
$ scp orapwDGUARD oracle@macbook2:/u01/app/oracle/product/10.2.0/db_1/dbs/orapwDGUARD
oracle@macbook2's password:
orapwDGUARD 100% 1536 1.5KB/s 00:00


On the standby machine, edit the initDGUARD.ora initialization parameter file that you have copied from primary database into the directory $ORACLE_HOME/dbs/ as in the following example:

DB_UNIQUE_NAME=STANDBY
SERVICE_NAMES=STANDBY
LOG_ARCHIVE_CONFIG='DG_CONFIG=(PRIMARY,STANDBY)'
LOG_ARCHIVE_DEST_1='LOCATION=USE_DB_RECOVERY_FILE_DEST VALID_FOR=(ALL_LOGFILES,ALL_ROLES) DB_UNIQUE_NAME=STANDBY'
LOG_ARCHIVE_DEST_2='SERVICE=PRIMARY LGWR ASYNC VALID_FOR=(ONLINE_LOGFILES,PRIMARY_ROLE) DB_UNIQUE_NAME=PRIMARY'
LOG_ARCHIVE_DEST_STATE_1=ENABLE
LOG_ARCHIVE_DEST_STATE_2=ENABLE
## Standby Role Parameters ##
STANDBY_FILE_MANAGEMENT=AUTO
FAL_SERVER=PRIMARY_macbook1
FAL_CLIENT=STANDBY_macbook2

Remember to edit also the following line:
*.control_files='/u01/app/oracle/oradata/DGUARD/standby_control01.ctl','/u01/app/oracle/oradata/DGUARD/standby_control02.ctl','/u01/app/oracle/oradata/DGUARD/standby_control03.ctl'

Then go to the directory $ORACLE_BASE/oradata/DGUARD/ and type the following commands to multiplex your standby control files:
$ cp standby_control01.ctl standby_control02.ctl
$ cp standby_control01.ctl standby_control03.ctl

DON'T change the value of the parameter DB_NAME='DGUARD' into DB_NAME='STANDBY' (you are using the control file provided by primary database and in that file there's written that the database name is DGUARD and not STANDBY.)
Just add DB_UNIQUE_NAME=STANDBY in the standby pfile.

Then, from the standby database machine, type as oracle user (see the picture below):
sqlplus "/ as sysdba"
create spfile from pfile='initDGUARD.ora'
startup mount;


Now it's time to configure the listeners and the net services names... that is ... create the file listener.ora and
tnsnames.ora on both the databases into the directory $ORACLE_HOME/network/admin/
Before, because I experienced problems make sure the loopback entry in /etc/hosts is not missing when you start the listener:
127.0.0.1 localhost

and make sure you have the libaio-devel package installed on both machine.
On hostname macbook1 type as root user (see the picture below):
rpm -q libaio-devel
and eventually install the package mounting the ISO 3
rpm -Uvh libaio-devel-0.3.105-2.i386.rpm


On macbook2 type as root user (see the picture below):
rpm -q libaio-devel
and eventually install the package mounting the ISO 3
rpm -Uvh libaio-devel-0.3.105-2.i386.rpm


Create the following listener.ora file into the directory $ORACLE_HOME/network/admin/ of the primary machine (see the picture below):
# listener.ora Network Configuration File: /u01/app/oracle/product/10.2.0/db_1/network/admin/listener.ora
# Generated by Oracle configuration tools.

LISTENER =
(DESCRIPTION_LIST =
(DESCRIPTION =
(ADDRESS = (PROTOCOL = TCP)(HOST = macbook1)(PORT = 1521))
)
)

Create the following tnsnames.ora file into the directory $ORACLE_HOME/network/admin/ of the primary machine (macbook1 has 192.168.0.10 as static IP, macbook2 has 192.168.0.11 as static IP):
# tnsnames.ora Network Configuration File: /u01/app/oracle/product/10.2.0/db_1/network/admin/tnsnames.ora
# Generated by Oracle configuration tools.

STANDBY_MACBOOK2 =
(DESCRIPTION =
(ADDRESS_LIST =
(ADDRESS = (PROTOCOL = TCP)(HOST = 192.168.0.11)(PORT = 1521))
)
(CONNECT_DATA =
(SERVICE_NAME = STANDBY)
)
)


Create the following listener.ora file into the directory $ORACLE_HOME/network/admin/ of the standby machine (see the picture below):
# listener.ora Network Configuration File: /u01/app/oracle/product/10.2.0/db_1/network/admin/listener.ora
# Generated by Oracle configuration tools.

LISTENER =
(DESCRIPTION_LIST =
(DESCRIPTION =
(ADDRESS = (PROTOCOL = TCP)(HOST = macbook2)(PORT = 1521))
)
)

Create the following tnsnames.ora file into the directory $ORACLE_HOME/network/admin/ of the standby machine (macbook1 has 192.168.0.10 as static IP, macbook2 has 192.168.0.11 as static IP):
# tnsnames.ora Network Configuration File: /u01/app/oracle/product/10.2.0/db_1/network/admin/tnsnames.ora
# Generated by Oracle configuration tools.

PRIMARY_MACBOOK1 =
(DESCRIPTION =
(ADDRESS_LIST =
(ADDRESS = (PROTOCOL = TCP)(HOST = 192.168.0.10)(PORT = 1521))
)
(CONNECT_DATA =
(SERVICE_NAME = STANDBY)
)
)


Click here to read the next post


Wednesday, March 7, 2007

Oracle Data Guard: 01 physical standby database configuration

Click here to read the previous step.

To create a standby database is preferred to have the same names and path names for all the Oracle files (datafiles, redo log files, control files) of the primary database.

Online redo logs, archived redo logs and standby redo logs are used to maintaining the transactional consistency of the primary and standby databases.
In the following table you can see the relationships between these files and the type of database:


For this dataguard configuration I will setup two virtual machines, in order the primary and the physical standby:

Primary
hostname: macbook1
static IP: 192.168.0.10
DB_NAME: DGUARD
DB_UNIQUE_NAME: PRIMARY
SERVICE_NAMES: PRIMARY
listener: default listener configuration
net service name to point to the standby database: STANDBY_MACBOOK2

Standby
hostname: macbook2
static IP: 192.168.0.11
DB_NAME: DGUARD
DB_UNIQUE_NAME: STANDBY
SERVICE_NAMES: STANDBY
listener: default listener configuration
net service name to point to the standby database: STANDBY_MACBOOK2

The pictures below describe the dbca installation of the primary database.


Click here to read the next step.

Tuesday, March 6, 2007

Oracle Data Guard: general informations

Click here to read the previous step.

Now that I have a working Oracle 10g database (read this steps 1, 2, 3, if you want to know more about it) I can use it as a primary database in an Oracle Data Guard configuration with the other virtual Linux machine created in this step.

What is a Data Guard configuration and when do you have to use it ??!!??
Oracle Data Guard has been designed to provide an efficient disaster recovery solution and gives us the ability to failover in the event of a disaster.

What does it happen if someone/something fisically destroy our previous Rac environment ???
Data Guard can be configured to guarantee no data loss and to minimize downtime of the production database.

How is Data Guard able to provide an efficient disaster recovery solution ??!!??
It simply :) maintains transactionally consistent copies of the primary production database at a remote site.
These copies are called standby databases and can be one of two types: physical or logical.
In my first configuration I will setup a "physical" standby database on my second Linux virtual machine.

What is the difference between a physical and logical standby database ??!!??
A physical standby database is a block-for-block identical copy of the primary database because it is kept in sync with the primary database by using media recovery to apply redo that was generated on the primary database.
Instead a logical standby database is kept in sync with the primary database using the SQL Apply engine. SQL Apply Engine transforms redo data received from the primary into logical SQL statements and then executes those SQL statements against the standby database: so a logical standby database has the same logical information but a different physical structure.

It's important to remember that a logical standby does not support all Oracle datatypes.
You can run this query
select distinct owner, table_name
from dba_logstdby_unsupported
order by owner;
to see if you are using unsupported objects.
So before setting up a logical standby database, ensure the logical standby database can maintain the data types and tables in your primary database, otherwise your only and best choice is to setup a physical standby database.

Click here to read the next step

Monday, March 5, 2007

Oracle Unbreakable Enterprise Linux: 03 Oracle Database 10g installation

Click here to read the previous step.

Go to the Oracle home page and download your copy of Oracle Database 10g Enterprise Edition, because Oracle Data Guard is available only as a feature of Oracle Database Enterprise Edition.
After I've downloaded the Oracle Database 10g R2 software, I unzipped the file in my home directory, so I type:
/home/oracle/database/runInstaller
to start the Oracle Universal Installer. On the Select Installation Method screen choose Advanced Installation and then click the NEXT button (see the figure below).


At the Specify Inventory directory and credentials screen enter the full path of the inventory directory (/u01/app/oracle/oraInventory) and specify the Operating System group name (oinstall) and click NEXT.
Select Enterprise Edition for Installation Type and click NEXT.
The OUI should read your Oracle environment and suggest a name and a path for Home Details (see the figure below) and click NEXT.


OUI will perform the prerequisite checks: it will suggest to improve our RAM, but we can ignore this warning.
At the Select Configuration Option choose Create a Database and click NEXT; the option Install database Software only will be used when I will begin to setup the standby database running on the other virtual machine (EnterpriseLinux_Guard).
On the Select Database Configuration choose Advanced which allows you to customize the configuration of your starter database and click NEXT.
At the Summary screen click INSTALL and the installation process will start (see the figure below).


When dbca will show to you its first step select General Purpose as template for your database and then click NEXT.
At the step two type a global database name (primary.dataguard.com) and a SID (primary) (see the figure below). Then click NEXT.


At the step three accept the default options (see the figure below) and then click next.


At the step four give a password to be used for All Accounts and then click next.
At the step five select File System as storage mechanism and then click next.
At the step six select Use Oracle-Managed Files as locations for the database files and then click next.
At the step seven check Specify Flash Recovery Area and Enable Archiving: then click next.
At the step eight uncheck the Sample Schemas and then click next. Accept clicking OK the dbca info about the memory requirement.
At the step nine simply click NEXT.
At the step ten select the Redo Log Groups number 3 and click on DELETE button. When asked click YES (see the figure below).


Press the OK button at the summary screen and dbca will finally begin to copy the database files (see the figure below).


When dbca finish to create the database files it will show to you another summary window (see the figure below); click the EXIT button to proceed ahead.


The OUI will continue te setup process. Wait for the "Execute Configuration scripts" window; open a terminal, log in as root, run the scripts (/u01/ap/oracle/oraInventory/orainstRoot.sh and /u01/ap/oracle/product/10.2.0/db_1/root.sh). The second script will ask you the location of the local bin directory. Press ENTER button on your keyboard.
After you have executed these scripts return on the "Execute Configuration scripts" window and click OK.
At the end of installation process click the EXIT button and then the YES button.


Type into your Mozilla Firefox window the Enterprise Manager address (http://data.dataguard.com:1158/em), accept the License
and then log in as sysdba. Your database and Enterprise Manager are working!!!


In the next step I will introduce some Data Guard concepts and later I will configure a Data Guard environment with our two virtual machine.

Oracle Unbreakable Enterprise Linux and Oracle Database 10g : 02 System Requirements

Click here to read the previous step.

Let's continue setting up the system requirement for our Oracle Database 10g installation.
First of all we have to edit the /etc/sysctl.conf file, so type
vi /etc/sysctl.conf
and then add the following lines:
kernel.shmall = 2097152
kernel.shmmax = 2147483648
kernel.shmmni = 4096
# semaphores: semmsl, semmns, semopm, semmni
kernel.sem = 250 32000 100 128
fs.file-max = 65536
net.ipv4.ip_local_port_range = 1024 65000
net.core.rmem_default=262144
net.core.rmem_max=262144
net.core.wmem_default=262144
net.core.wmem_max=262144
Now we have to permanently change the current kernel parameters so we have to issue the following command:
/sbin/sysctl -p
Add the following lines to the /etc/security/limits.conf file:
* soft nproc 2047
* hard nproc 16384
* soft nofile 1024
* hard nofile 65536
Add the following line to the /etc/pam.d/login file, if it does not already exist:
session required /lib/security/pam_limits.so
Some packages are required for Oracle Database 10g setup. Issue the following commands to see which versions of these packages are installed on our system:
rpm -q binutils compat-db control-center gcc gcc-c++ glibc glibc-common gnome-libs libstdc++ libstdc++-devel make pdksh sysstat xscreensaver openmotif21 libaio
Mount Enterprise-R4-U4-i386-disc3.iso into vmWare's CDROM device and then type:
cd /media/cdrom/Enterprise/RPMS
rpm -Uvh libaio-0*
rpm -Uvh openmotif21*
Issue the following commands as root user to create the Linux groups and user account that will be used to install and maintain the Oracle Database 10g software. The user account will be called oracle, and the groups will be oinstall and dba.
/usr/sbin/groupadd oinstall
/usr/sbin/groupadd dba
/usr/sbin/useradd -m -g oinstall -G dba -s /bin/ksh oracle
Then set the password for the oracle account:
passwd oracle
I will use oracle/oracle :)
Issue the following commands to create the directories in which the Oracle software will be installed:
mkdir -p /u01/app/oracle
chown -R oracle.oinstall /u01
chmod -R 775 /u01
Add at the end of the /etc/profile file the following command:
if [ \$USER = "oracle" ]; then
if [ \$SHELL = "/bin/ksh" ]; then
ulimit -p 16384
ulimit -n 65536
else
ulimit -u 16384 -n 65536
fi
umask 022
fi
Add at the end of the /etc/csh.login file the following command:
if ( \$USER == "oracle" ) then
limit maxproc 16384
limit descriptors 65536
umask 022
endif
Type vi /home/oracle/.profile after logged in as oracle user and add the following lines at the end of the file:
# Oracle Settings
export ORACLE_SID=primary
export ORACLE_BASE=/u01/app/oracle
export ORACLE_HOME=$ORACLE_BASE/product/10.2.0/db_1
export LD_LIBRARY_PATH=$ORACLE_HOME/lib
export PATH=$ORACLE_HOME/bin:/bin:
/usr/bin:/usr/sbin:/usr/local/bin:/usr/X11R6/bin
umask 022
Always as oracle user type:
mkdir -p $ORACLE_BASE/admin
mkdir -p $ORACLE_HOME
In the next step I will install the Oracle Database 10g, but before I would like to physically copy this machine to another locations.
This is useful because it is a faster way to create another Linux environments and another virtual machine that will be part of a future Data Guard configuration as standby database.

I created the primary database on the directory C:\EnterpriseLinux_Data, so create another directory (C:\EnterpriseLinux_Guard) and copy and paste all the files from C:\EnterpriseLinux_Data directory into C:\EnterpriseLinux_Guard directory

Now from your vmWare GSX server select File->Open Virtual Machine and then click on Browse button to add your future standby database (I selected the file C:\EnterpriseLinux_Guard\rhel4.vmx). Then click on Edit virtual machine settings and change the name of this "standby database" machine in guard.

At this point you will see two tabs on your vmWare GSX server, data and guard: now this time start the "standby database" machine (guard). The first time you will be asked if create a new identifier for this machine... You have to create a new identifier.
Finally you have to see a figure like this below.


You will see while your "standby database" machine is starting that a MAC address misconfiguration is detected: this is because you have to probe for new MAC address using system-config-network tool from a root terminal.
So as root user type on your terminal system-config-network and for each network device check for a new MAC address (see the figure below).


Change also your hostname from data.dataguard.com to guard.dataguard.com.
vi /etc/hosts
Save your network configuration and type
/etc/init.d/network restart
Type
hostname
to see if you have written the right hostname for your "standby database" machine (you should see guard.dataguard.com).
Login as oracle user (su - oracle) and edit your .profile file, changing the ORACLE_SID variable in standby (see the figure below).


Click here to read the next step.

Oracle Unbreakable Enterprise Linux

This time I will configure a vmWare virtual machine to install and setup Oracle Unbreakable Enterprise Linux and Oracle Database 10g. This machine will be part of a future (coming soon) Oracle Data Guard configuration using vmWare. Available as a feature of the Enterprise Edition of the Oracle Database, Data Guard can be used in combination with other Oracle High Availability (HA) solutions such as Real Application Clusters (RAC), Oracle Flashback and Oracle Recovery Manager (RMAN), to provide a very high level of data protection and data availability.

So, in particular, this machine will be referred to as the primary database of the Data Guard configuration. In a second time I will configure another virtual machine to be used as standby database, a transactionally consistent copy of the primary database. In both these machines I will use Oracle Unbreakable Enterprise Linux: it's important to remember that all members of a Data Guard configuration must run an Oracle image that is built for the same platform. This means, I cannot have a primary database configured on a 32-bit Linux system and a standby database on a 32-bit Windows system.

So let's start with the new installation...

Select New Virtual Machine (see the figure below) and then click NEXT.


Select Custom as Virtual machine configuration and then click NEXT.
Select Linux as Guest operating system and Red Hat Enterprise Linux 4 as Version and then click NEXT.
Give a name to your virtual machine (I typed EnterpriseLinux_Data, because in a second moment this machine will be part of an Oracle Data Guard configuration, so stay tuned),
select your preferred location and then click NEXT.
Click NEXT from the Set Access Rights screen and then again, click NEXT, from Startup / Shutdown Options screen.
Specify 512 as Memory and then click NEXT.
Select Use bridged networking as Network Connection and then click NEXT.
Select SCSI Adapter LSI Logic as I/0 and then click NEXT.
Select Create a new virtual disk from Select a Disk screen and then click NEXT.
Select SCSI (Recommended) as Virtual Disk Type and then click NEXT.
Specify 9GB as Disk Size, deselect Allocate all disk space now (see the figure below) and then click NEXT.


Specify where to save your virtual files, give them a name (I used C:\EnterpriseLinux_Data\EnterpriseLinux_Data.vmdk) and then click NEXT.
From the VMware Vitrual Machine Console, click on Edit virtual machine settings and edit your CDROM configuration to read your Oracle Enterprise Unbreakable Linux iso image (Enterprise-R4-U4-i386-disc1.iso) during the start up. Now we are ready to start our machine and to begin the installation of the first image Enterprise-R4-U4-i386-disc1.iso of Oracle Enterprise Unbreakable Linux release.


At the boot screen.. simply press ENTER
Then choose Skip to skip the media test (you should have Enterprise-R4-U4-i386-disc1.iso, Enterprise-R4-U4-i386-disc2.iso, Enterprise-R4-U4-i386-disc3.iso and Enterprise-R4-U4-i386-disc4.iso image)
From the Welcome screen (see the figure below) click on the NEXT button.


Select your installation language and then click NEXT.
Select your Keyboard Configuration and then click NEXT.
Select Custom as Installation Type (see the figure below) and then click NEXT.


Select Manually partition with Disk Druid as Disk Partitioning Setup and then click NEXT.
When the Warning is showed click on the YES button.


For simplicity I will just add a root partition and a swap partition.
Select the New button, select swap as File System Type, type 1024 as Size (see the figure below) and clik OK.


Select again the New button, select ext3 as File System Type, select / as Mount Point,
check Fill to maximum allowable size (see the figure below) and clik OK.


Click NEXT from Disk Setup screen.
Click NEXT from Boot Loader Configuration screen.
Select Edit from Network Configuration screen and type your static IP (see the figure below) or if you have a DHCP, select Configure using DHCP. Then click OK.


Because I use a static IP I should select an hostname for this machine. I will use data.dataguard.com (see the figure below).


Type your Gateway and DNS settings if you have it and then click NEXT.
Disable the firewall and enable SELinux and then click NEXT.
Click on Proceed button.
Select your default language and then click NEXT.
Select your Time Zone and then click NEXT.
Type your root password and then click NEXT.
Select from the Package Group Selection:
* X Window System
* GNOME Desktop Environment
* Editors (I have selected the vi editor)
* Graphical Internet
* Sound and Video
* Server Configuration Tools
* FTP Server
* Legacy Network Server(rsh-server and telnet-server must be selected)
* Development Tools
* Legacy Software Development
* Administration Tools
* Give attention to the System Tools:
Select oracleasm-2.6.9-42.0.0.0.1EL (uniprocessor) for UP kernel or select oracleasm-2.6.9-42.0.0.0.1ELsmp for SMP (symmetric multiprocessor) kernel.
Then select sysstat because this package contains utilities to monitor system performance and usage activity such as iostat (CPU statistics and input/output statistics for devices, partitions and network filesystems) and sar (it collects, reports and saves system activity information).
and then click NEXT.
From the About to Install click NEXT and then the Continue button.
When asked, insert the disk 2 (Enterprise-R4-U4-i386-disc2.iso) editing your CDROM settings (see the figure below) and then click OK.


When asked, insert the disk 3 (Enterprise-R4-U4-i386-disc3.iso) editing your CDROM settings again (see the figure below) and then click OK.


When the installation is completed disconnect your CDROM (see the figure below) and then click the Reboot button.


Your machine will reboot.
On the Welcome screen click the NEXT button.
Select Yes, I agree to the License Agreement and then click the NEXT button.
Set your Time and Date and then click the NEXT button.
On the Display screen select Configure and then set the model of your monitor (see the figure below)


Then eventually change your Resolution (see the figure below) and then click the NEXT button.


I won't add a System User as suggested, so after click on the NEXT button, click also on the Continue button showed by the Warning window.
Click NEXT on Additional CDs and NEXT again on Finish Setup screen.
Login as root and next time I will start to install again the Oracle Database 10g, after have prepared the right Oracle environment.

Click here for the next step.